实验环境
CentOS7, Tomcat7(tomcat-1, tomcat-2), Nginx1.8.1, redis3.0.7
安装redis与tomcat
1 | [root@localhost ~]# wget http://download.redis.io/releases/redis-3.0.7.tar.gz |
在tomcat-1和tomcat-2的webapps/ROOT目录下新增一个名叫session.jsp的文件,内容如下:
1 | <%@ page %> |
修改tomcat与nginx配置
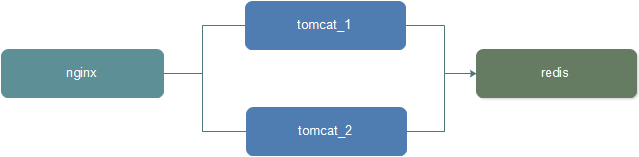
架设场景如下图:
- 修改tomcat端口(conf/server.xml)
tomcat1:Server port=”8105”,Connector port=”8081”,ajp Connector port=”8109”
tomcat2:Server port=”8205”,Connector port=”8082”,ajp Connector port=”8209”
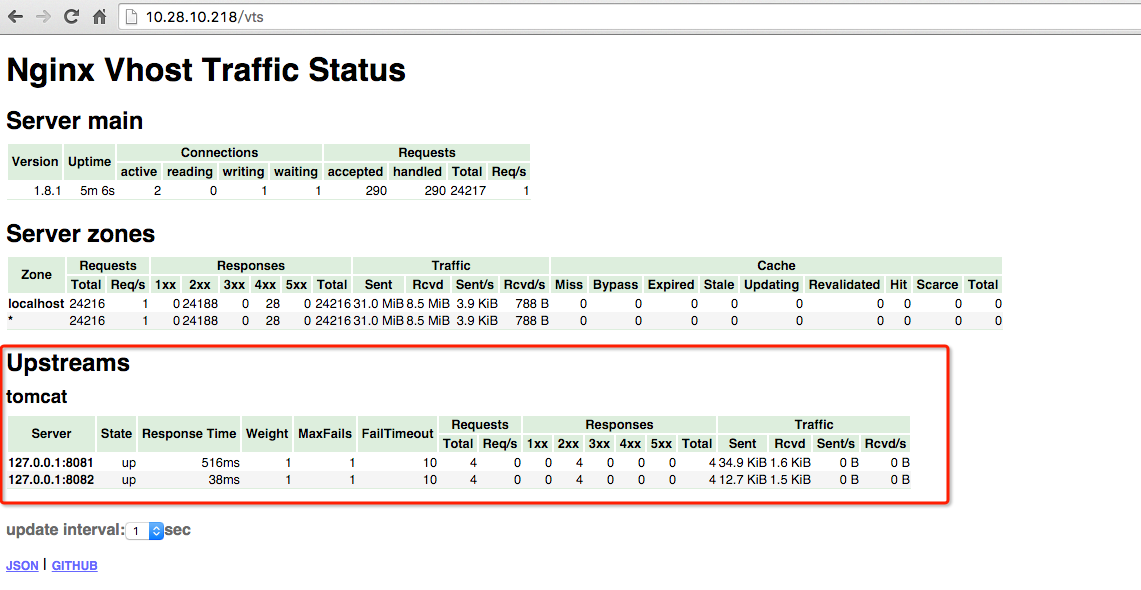
- 修改nginx配置,以随机访问的方式将请求引入后端的tomcat集群中然后访问http://10.28.10.218/session.jsp 可以看到服务器随机返回给我们两个tomcat的session页面。同时我们也可以看到SessionId在不停的变化。
1
2
3
4
5
6
7
8
9
10
11
12
13
14
15
16
17
18
19
20
21
22
23
24
25
26
27
28
29
30
31http {
upstream tomcat {
server 127.0.0.1:8081;
server 127.0.0.1:8082;
}
server {
listen 80;
server_name localhost;
#charset koi8-r;
#access_log logs/host.access.log main;
location ~ .*\.(do|jsp|action)?$ {
proxy_redirect off;
proxy_set_header Host $host;
proxy_set_header X-Real-IP $remote_addr;
proxy_set_header X-Forwarded-For $proxy_add_x_forwarded_for;
root html;
index index.html index.htm;
proxy_pass http://tomcat;
}
#配置Nginx动静分离,定义的静态页面直接从Nginx发布目录读取。
location ~ .*\.(html|htm|gif|jpg|jpeg|bmp|png|ico|txt|js|css)$ {
root /data/;
gzip_static on; #开启压缩静态资源
}
location / {
root html;
index index.html index.htm;
}
}
}


通过Nginx的监控页也可以看出请求被随机的转发到了tomcat中
将tomcat的session都存储到redis中
Tomcat存储到Redis库项目地址:https://github.com/jcoleman/tomcat-redis-session-manager
从gradle配置上看,此项目还有三个依赖库。通过gradle进行编译,最终会自动从网络下载commons-pool,commons-pool2,jedis库并编译生成tomcat-redis-session-manager。
1 | dependencies { |
觉得麻烦的同学可以直接下载以下库,放入到tomcat/lib下:
commons-pool-1.5.5.jar
commons-pool2-2.2.jar
jedis-2.0.0.jar
tomcat-redis-session-manager-1.2-tomcat-7-1.2.jar
按tomcat-redis-session-manager在github上地址里的说明修改两个tomcat的context.xml(tomcat/conf/context.xml)增加存储配置
1 | <Valve className="com.radiadesign.catalina.session.RedisSessionHandlerValve" /> |
修改好配置后,启动tomcat-1和tomcat-2。再访问session.jsp时你会发现无论是从哪一个tomcat返回的页面同一个客户端的sessionID都是相同的,这就达到了session在集群tomcat下共享的目的。


通过redis-cli命令连接到redis服务器,可以看到对应sessionID的数据已存储到了redis中。

提醒:session的超时时间由context.xml中的maxInactiveInterval配置,默认60秒
观点仅代表自己,期待你的留言。