实验环境
CentOS7, Tomcat7(tomcat-1, tomcat-2), Nginx1.8.1, redis3.0.7
tomcat1:Server port=”8105”,Connector port=”8081”,ajp Connector port=”8109”
tomcat2:Server port=”8205”,Connector port=”8082”,ajp Connector port=”8209”
集群环境下tomcat的session处理方式
一、upstream ip_hash(不推荐使用)
nginx中的ip_hash技术能够将某个ip的请求定向到同一台后端,这样一来这个ip下的某个客户端和某个后端就能建立起稳固的session,ip_hash是在upstream配置中定义的:
1
2
3
4
5
| upstream backend {
server 127.0.0.1:8081 ;
server 127.0.0.1:8082 ;
ip_hash;
}
|
不推荐使用的原因如下:
- nginx不是最前端的服务器。 ip_hash要求nginx一定是最前端的服务器,否则nginx得不到正确ip,就不能根据ip作hash。譬如使用的是squid为最前端,那么nginx取ip时只能得到squid的服务器ip地址,用这个地址来作分流是肯定错乱的。
- nginx的后端还有其它方式的负载均衡。
假如nginx后端又有其它负载均衡,将请求又通过另外的方式分流了,那么某个客户端的请求肯定不能定位到同一台session应用服务器上。
- 多个外网出口。
很多公司上网有多个出口,多个ip地址,用户访问互联网时候自动切换ip。而且这种情况不在少数。使用 ip_hash 的话对这种情况的用户无效,无法将某个用户绑定在固定的tomcat上 。二、nginx_upstream_jvm_route (nginx module, 无法故障转移)
nginx_upstream_jvm_route 是一个nginx的扩展模块,用来实现基于 Cookie 的 Session Sticky 的功能。
简单来说,它是基于cookie中的JSESSIONID来决定将请求发送给后端的哪个server,nginx_upstream_jvm_route会在用户第一次请求后端server时,将响应的server标识绑定到cookie中的JSESSIONID中,从而当用户发起下一次请求时,nginx会根据JSESSIONID来决定由哪个后端server来处理。
但是当客户端对应的tomcat挂掉之后,客户端的请求将不能通过其它tomcat代替进行处理,也就是说 __nginx_upstream_jvm_route不支持故障转移__。
三、tomcat-redis-session-manager (java lib, 推荐使用)
通过集群实例tomcat连接到同一个redis,将sessionID存储在redis中完成session共享。由于session共享,所以支持故障转移。
详见我的另一篇博文《Nginx+tomcat+redis集群之session共享》
nginx_upstream_jvm_route安装配置
github地址:https://github.com/nulab/nginx-upstream-jvm-route
安装方法如下:
1
2
3
4
5
6
7
8
9
10
11
12
13
14
15
16
17
18
19
20
21
22
23
24
25
26
27
28
29
30
31
32
| [root@localhost ~]# git clone https://github.com/nulab/nginx-upstream-jvm-route.git
[root@localhost ~]# cd nginx-1.8.1 //注意:一定是进入到nginx安装目录打补丁
[root@localhost nginx-1.8.1]# patch -p0 < ../nginx-upstream-jvm-route/jvm_route.patch
patching file src/http/ngx_http_upstream.c
Hunk #1 succeeded at 5281 (offset 672 lines).
Hunk #2 succeeded at 5380 (offset 678 lines).
Hunk #3 succeeded at 5397 (offset 656 lines).
Hunk #4 succeeded at 5434 (offset 656 lines).
Hunk #5 succeeded at 5467 (offset 656 lines).
Hunk #6 succeeded at 5527 (offset 671 lines).
patching file src/http/ngx_http_upstream.h
Hunk #1 succeeded at 96 (offset 4 lines).
Hunk #2 succeeded at 110 (offset 4 lines).
[root@localhost nginx-1.8.1]# ./configure --with-pcre=../pcre-8.38 --with-zlib=../zlib-1.2.8 --with-http_gzip_static_module --with-http_ssl_module --add-module=../nginx_tcp_proxy_module/ \--add-module=../nginx_upstream_check_module/ \--add-module=../nginx-module-vts/ \--add-module=../nginx-upstream-jvm-route/
[root@localhost nginx-1.8.1]# make
[root@localhost nginx-1.8.1]# mv /usr/local/nginx/sbin/nginx /usr/local/nginx/sbin/nginx.old
mv:是否覆盖"/usr/local/nginx/sbin/nginx.old"? y
[root@localhost nginx-1.8.1]# cp objs/nginx /usr/local/nginx/sbin/
[root@localhost nginx-1.8.1]# make upgrade
/usr/local/nginx/sbin/nginx -t
nginx: the configuration file /usr/local/nginx/conf/nginx.conf syntax is ok
nginx: configuration file /usr/local/nginx/conf/nginx.conf test is successful
kill -USR2 `cat /usr/local/nginx/logs/nginx.pid`
sleep 1
test -f /usr/local/nginx/logs/nginx.pid.oldbin
kill -QUIT `cat /usr/local/nginx/logs/nginx.pid.oldbin`
[root@localhost nginx-1.8.1]# /usr/local/nginx/sbin/nginx -V
nginx version: nginx/1.8.1
built by gcc 4.8.5 20150623 (Red Hat 4.8.5-4) (GCC)
built with OpenSSL 1.0.1e-fips 11 Feb 2013
TLS SNI support enabled
configure arguments: --with-pcre=../pcre-8.38 --with-zlib=../zlib-1.2.8 --with-http_gzip_static_module --with-http_ssl_module --add-module=../nginx_tcp_proxy_module/ --add-module=../nginx_upstream_check_module/ --add-module=../nginx-module-vts/ --add-module=../nginx-upstream-jvm-route/
|
配置nginx.conf
1
2
3
4
5
6
7
8
9
10
11
12
13
14
15
16
17
18
19
20
21
| http {
upstream tomcats_jvm_route {
server 127.0.0.1:8081 srun_id=tomcat01;
server 127.0.0.1:8082 srun_id=tomcat02;
jvm_route $cookie_JSESSIONID|sessionid reverse;
}
server {
#....原有配置.....
location ~ .*\.(do|jsp|action)?$ {
proxy_redirect off;
proxy_set_header Host $host;
proxy_set_header X-Real-IP $remote_addr;
proxy_set_header X-Forwarded-For $proxy_add_x_forwarded_for;
root html;
index index.html index.htm;
#proxy_pass http://tomcat;
proxy_pass http://tomcats_jvm_route;
}
#....原有配置.....
}
}
|
修改tomcat的server.xml配置:
1
2
| <Engine name="Catalina" defaultHost="localhost" jvmRoute="tomcat01">
<Engine name="Catalina" defaultHost="localhost" jvmRoute="tomcat02">
|
验证生效
1
2
3
4
5
6
7
8
9
10
11
12
13
14
15
16
17
18
19
20
21
22
23
| [root@localhost ~]# ps -ef |grep tomcat|grep -v grep|awk '{print $2}'
19914
20029
[root@localhost ~]# ps -ef |grep tomcat|grep -v grep|awk '{print $2}'|xargs kill
[root@localhost ~]# ps -ef |grep tomcat|grep -v grep|awk '{print $2}'
[root@localhost ~]# cd tomcat-1/
[root@localhost tomcat-1]# ./bin/startup.sh
Using CATALINA_BASE: /root/tomcat-1
Using CATALINA_HOME: /root/tomcat-1
Using CATALINA_TMPDIR: /root/tomcat-1/temp
Using JRE_HOME: /usr/local/jdk1.7.0_60
Using CLASSPATH: /root/tomcat-1/bin/bootstrap.jar:/root/tomcat-1/bin/tomcat-juli.jar
Tomcat started.
[root@localhost tomcat-1]# cd ../tomcat-2
-bash: cd: tomcat-2: 没有那个文件或目录
[root@localhost tomcat-2]# ./bin/startup.sh
Using CATALINA_BASE: /root/tomcat-1
Using CATALINA_HOME: /root/tomcat-1
Using CATALINA_TMPDIR: /root/tomcat-1/temp
Using JRE_HOME: /usr/local/jdk1.7.0_60
Using CLASSPATH: /root/tomcat-1/bin/bootstrap.jar:/root/tomcat-1/bin/tomcat-juli.jar
Tomcat started.
[root@localhost tomcat-2]# /usr/local/nginx/sbin/nginx -t;/usr/local/nginx/sbin/nginx -s reload;
|


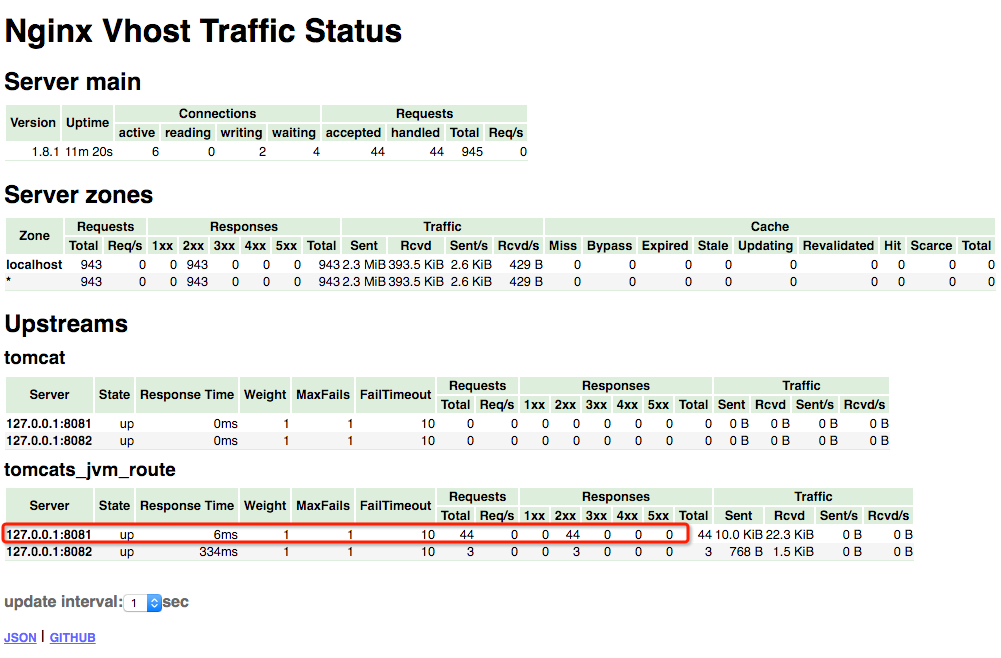
从上图的结果来看:
- 1: sessionID的后面增加了第一个为客户端服务的最终tomcat实例标识。
- 2: 在不停的刷新页面的时候都是同一个tomcat实例返回的页面。从vts的监控图可以看出,请求都被导流到同一个tomcat实例上。
- 3: 在停止tomcat1后,再对浏览器进行刷新操作,发现请求被导到tomcat2上,但对应的sessionId也发生了变化,说明服务器端认定这是一个新的客户端进行的请求操作。验证了我之前所说,__这种方式不支持故障转移__。
观点仅代表自己,期待你的留言。