UIView的layoutSubviews和drawRect

UIView的setNeedsDisplay和setNeedsLayout方法。首先两个方法都是异步执行的。setNeedsDisplay会调用自动调用drawRect方法,这样可以拿到UIGraphicsGetCurrentContext,就可以画画了。而setNeedsLayout会默认调用layoutSubViews,就可以处理子视图中的一些数据。
综上两个方法都是异步执行的,layoutSubviews方便数据计算,drawRect方便视图重绘。

先大概看下ios layout机制相关的这几个方法:

  • (CGSize)sizeThatFits:(CGSize)size
  • (void)sizeToFit
    ——————-
  • (void)layoutSubviews
  • (void)layoutIfNeeded
  • (void)setNeedsLayout
    ——————–
  • (void)setNeedsDisplay
  • (void)drawRect

一、layoutSubviews在以下情况下会被调用:

1、init初始化不会触发layoutSubviews。
2、addSubview会触发layoutSubviews。
3、设置view的Frame会触发layoutSubviews,当然前提是frame的值设置前后发生了变化。
4、滚动一个UIScrollView会触发layoutSubviews。
5、旋转Screen会触发父UIView上的layoutSubviews事件。
6、改变一个UIView大小的时候也会触发父UIView上的layoutSubviews事件。
7、直接调用setLayoutSubviews。
8、直接调用setNeedsLayout。
在苹果的官方文档中强调:You should override this method only if the autoresizing behaviors of the subviews do not offer the behavior you want.
layoutSubviews, 当我们在某个类的内部调整子视图位置时,需要调用。
反过来的意思就是说:如果你想要在外部设置subviews的位置,就不要重写。

刷新子对象布局
-layoutSubviews方法:这个方法,默认没有做任何事情,需要子类进行重写
-setNeedsLayout方法: 标记为需要重新布局,异步调用layoutIfNeeded刷新布局,不立即刷新,但layoutSubviews一定会被调用
-layoutIfNeeded方法:如果,有需要刷新的标记,立即调用layoutSubviews进行布局(如果没有标记,不会调用layoutSubviews)
如果要立即刷新,要先调用[view setNeedsLayout],把标记设为需要布局,然后马上调用[view layoutIfNeeded],实现布局
在视图第一次显示之前,标记总是“需要刷新”的,可以直接调用[view layoutIfNeeded]

二、drawRect在以下情况下会被调用:

1、如果在UIView初始化时没有设置rect大小,将直接导致drawRect不被自动调用。drawRect 掉用是在Controller->loadView, Controller->viewDidLoad 两方法之后掉用的.所以不用担心在 控制器中,这些View的drawRect就开始画了.这样可以在控制器中设置一些值给View(如果这些View draw的时候需要用到某些变量 值).
2、该方法在调用sizeToFit后被调用,所以可以先调用sizeToFit计算出size。然后系统自动调用drawRect:方法。
sizeToFit会自动调用sizeThatFits方法;
sizeToFit不应该在子类中被重写,应该重写sizeThatFits
sizeThatFits传入的参数是receiver当前的size,返回一个适合的size
sizeToFit可以被手动直接调用
sizeToFit和sizeThatFits方法都没有递归,对subviews也不负责,只负责自己
3、通过设置contentMode属性值为UIViewContentModeRedraw。那么将在每次设置或更改frame的时候自动调用drawRect:。
4、直接调用setNeedsDisplay,或者setNeedsDisplayInRect:触发drawRect:,但是有个前提条件是rect不能为0。
-setNeedsDisplay方法:标记为需要重绘,异步调用drawRect
-setNeedsDisplayInRect:(CGRect)invalidRect方法:标记为需要局部重绘
以上1,2推荐;而3,4不提倡

drawRect方法使用注意点:
1、 若使用UIView绘图,只能在drawRect:方法中获取相应的contextRef并绘图。如果在其他方法中获取将获取到一个invalidate 的ref并且不能用于画图。drawRect:方法不能手动显示调用,必须通过调用setNeedsDisplay 或 者 setNeedsDisplayInRect,让系统自动调该方法。
2、若使用calayer绘图,只能在drawInContext: 中(类似鱼drawRect)绘制,或者在delegate中的相应方法绘制。同样也是调用setNeedDisplay等间接调用以上方法
3、若要实时画图,不能使用gestureRecognizer,只能使用touchbegan等方法来掉用setNeedsDisplay实时刷新屏幕

三、layoutSubviews对subviews重新布局

layoutSubviews方法调用先于drawRect
setNeedsLayout在receiver标上一个需要被重新布局的标记,在系统runloop的下一个周期自动调用layoutSubviews
layoutIfNeeded方法如其名,UIKit会判断该receiver是否需要layout.根据Apple官方文档,layoutIfNeeded方法应该是这样的
layoutIfNeeded遍历的不是superview链,应该是subviews链
drawRect是对receiver的重绘,能获得context
setNeedDisplay在receiver标上一个需要被重新绘图的标记,在下一个draw周期自动重绘,iphone device的刷新频率是60hz,也就是1/60秒后重绘


原地址:http://justsee.iteye.com/blog/1886463
开放平台Api的版本控制方案

简介

做开放平台供外部调用的Api理论上变化越少针对调用者来讲越有利,随着开放平台的功能不断完善(优化)不可避免的需要添加新的资源,或者修改现有资源。因此Api的更新升级必不可少,但是,对于开放平台来讲从一开始就应该将对外提供的Api加入版本管理。一个长期稳定可用的开放平台才能被越来越多的用户使用。
同理,Native的App与服务器Api也存在同样的关系,Native App安装在不同的移动设备上,如果Api变动都需要提示用户进行强制更新来适配新版本的Api接口,那么,App用户将异常烦躁甚至于将App从设备中Uninstall掉。

查看众多论坛与博客,总结出目前实现有三种方式:

  • URI
    在访问Api中增加version段来告诉服务器所使用的Api版本(如:http://xxxx/api/customers/v1.1/1234 )。 这种方式正是由于在uri中增加了version段,破坏掉了Api的统一访问URL。
  • Request Parameter
    在Api后增加请求参数来告诉服务器所使用的Api版本(如:http://xxxx/api/customers/1234?v=1.1 )这种方式与第一种URI的方式类似。
  • Request Header
    在请求Api时在Request的请求头中增加Version值来告诉服务器所使用的Api版本。这种方式保留了Api统一访问的URL,版本号传递更隐秘。但需要客户端在请求时增加此参数来完成,所以需要App在开发之初就需要增加版本号的传递。

综上所述,个人认为第三种 Request Header的传递方式具有统一了URL和Version段隐秘的优点,为最适合的传递方式。

Request Header方式实现版本控制

说完了客户端传递版本号的方式之后,我们来看一下服务端的处理。按流行的MVC的方式来看,个人觉得应该在控制层之前增加Api的版本控制层来先对客户端的请求Api进行版本的预判。

个人总结了一下,有以下几种预判结果:
1: Api为所有版本提供服务。
2: Api提供了最低版本,为大于此最低版本的请求提供服务。
3: Api提供了服务的版本范围,为大于最低版本且小于最高版本的请求提供服务。
4: Api已过期,由其它的Api代替。
5: Api已废弃不再提供服务。

按以上思路,按Java实现为例。可以通过 自定义注解(Annotation)+ 过滤器(Filter)实现。
相似的方案还有:自定义注解 + 拦截器, 自定义注解 + Spring AOP
同理,其它的语言均有类似技术可以实现。

接下来我将在 https://github.com/stotem/header-version-filter.git 中公布我的Annotation+Filter实现。


观点仅代表自己,期待你的留言。

Nginx+php-fpm替代apache服务器

简介

nginx本身不能处理PHP,它只是个web服务器,当接收到请求后,如果是php请求,则发给php解释器处理,并把结果返回给客户端。

nginx一般是把请求发fastcgi管理进程处理,fascgi管理进程选择cgi子进程处理结果并返回被nginx

本文以php-fpm为例介绍如何使nginx支持PHP
一、编译安装php-fpm

什么是PHP-FPM

PHP-FPM是一个PHP FastCGI管理器,是只用于PHP的,可以在 http://php-fpm.org/download 下载得到.

PHP-FPM其实是PHP源代码的一个补丁,旨在将FastCGI进程管理整合进PHP包中。必须将它patch到你的PHP源代码中,在编译安装PHP后才可以使用。

新版PHP已经集成php-fpm了,不再是第三方的包了,推荐使用。PHP-FPM提供了更好的PHP进程管理方式,可以有效控制内存和进程、可以平滑重载PHP配置,比spawn-fcgi具有更多有点,所以被PHP官方收录了。在./configure的时候带 –enable-fpm参数即可开启PHP-FPM。

新版php-fpm安装(推荐安装方式)

1
2
3
4
5
wget http://cn2.php.net/distributions/php-5.4.7.tar.gz
tar zvxf php-5.4.7.tar.gz
cd php-5.4.7
./configure --prefix=/usr/local/php --enable-fastcgi --enable-fpm --with-mcrypt --with-zlib --enable-mbstring --disable-pdo --with-curl --disable-debug --enable-pic --disable-rpath --enable-inline-optimization --with-bz2 --with-xml --with-zlib --enable-sockets --enable-sysvsem --enable-sysvshm --enable-pcntl --enable-mbregex --with-mhash --enable-xslt --enable-memcache --enable-zip --with-pcre-regex --with-mysql
make all install

旧版手动打补丁php-fpm安装

1
2
3
4
5
6
7
8
9
10
11
wget http://cn2.php.net/get/php-5.2.17.tar.gz
wget http://php-fpm.org/downloads/php-5.2.17-fpm-0.5.14.diff.gz

tar zvxf php-5.2.17.tar.gz
gzip -cd php-5.2.17-fpm-0.5.14.diff.gz | patch -d php-5.2.17 -p1
cd php-5.2.17
./configure --prefix=/usr/local/php --enable-fpm --with-mcrypt --enable-mbstring --disable-pdo --with-curl --disable-debug --disable-rpath --enable-inline-optimization --with-bz2 --with-zlib --enable-sockets --enable-sysvsem --enable-sysvshm --enable-pcntl --enable-mbregex --with-mhash --enable-zip --with-pcre-regex --with-mysql --with-mysqli --with-gd --with-jpeg-dir
make all install
cd /usr/local/php
cp etc/php-fpm.conf.default etc/php-fpm.conf
/usr/local/php/sbin/php-fpm

以上两种方式都可以安装php-fpm,安装后内容放在/usr/local/php目录下

二、修改nginx配置文件以支持php-fpm
nginx安装完成后,修改nginx配置文件为,nginx.conf

其中server段增加如下配置,注意标红内容配置,否则会出现No input file specified.错误

#pass the PHP scripts to FastCGI server listening on 127.0.0.1:9000

1
2
3
4
5
6
7
location ~ \.php$ {
root html;
fastcgi_pass 127.0.0.1:9000;
fastcgi_index index.php;
fastcgi_param SCRIPT_FILENAME $document_root$fastcgi_script_name;
include fastcgi_params;
}

转自:http://www.cnblogs.com/hujiong/archive/2013/02/20/2918509.html


Nginx反向代理多个域名

简介

由于公司内网有多台服务器的http服务要映射到公司外网静态IP,如果用路由的端口映射来做,就只能一台内网服务器的80端口映射到外网80端口,其他服务器的80端口只能映射到外网的非80端口。非80端口的映射在访问的时候要域名加上端口,比较麻烦。所以我们可以在内网搭建个nginx反向代理服务器,将nginx反向代理服务器的80映射到外网IP的80,这样指向到公司外网IP的域名的HTTP请求就会发送到nginx反向代理服务器,利用nginx反向代理将不同域名的请求转发给内网不同机器的端口,就起到了“根据域名自动转发到相应服务器的特定端口”的效果,而路由器的端口映射做到的只是“根据不同端口自动转发到相应服务器的特定端口”,真是喜大普奔啊。

Nginx配置

vim /usr/local/nginx/conf/reverse-proxy.conf

1
2
3
4
5
6
7
8
9
10
11
12
13
14
15
16
17
18
19
20
21
22
23
24
25
26
27
server {
listen 80;
server_name tomcat1.vip.com;
location /{
proxy_redirect off;
proxy_set_header Host $host;
proxy_set_header X-Real-IP $remote_addr;
proxy_set_header X-Forwarded-For $proxy_add_x_forwarded_for;
proxy_pass http://127.0.0.1:8081;
#proxy_pass http://tomcat;
}
access_log logs/tomcat1_access.log;
}

server {
listen 80;
server_name tomcat2.vip.com;
location /{
proxy_redirect off;
proxy_set_header Host $host;
proxy_set_header X-Real-IP $remote_addr;
proxy_set_header X-Forwarded-For $proxy_add_x_forwarded_for;
proxy_pass http://127.0.0.1:8082;
#proxy_pass http://tomcat;
}
access_log logs/tomcat2_access.log;
}

在nginx.conf的http节点中include配置文件reverse-proxy.conf

1
2
3
4
5
6
7
8
9
10
11
12
http {
include reverse-proxy.conf;

#按server段顺序匹配,如果没有匹配到则可通过泛域名匹配返回错误码或错误页
server {
listen 80;
server_name *.vip.com;
location /{
return 404;
}
}
}

测试生效

热部署nginx配置

1
2
3
[root@localhost ~]# /usr/local/nginx/sbin/nginx -t; /usr/local/nginx/sbin/nginx -s reload;
nginx: the configuration file /usr/local/nginx/conf/nginx.conf syntax is ok
nginx: configuration file /usr/local/nginx/conf/nginx.conf test is successful

在客户机的hosts中配置tomcat1.vip.com和tomcat2.vip.com (如果是已申请好的域名,则可跳过此步骤)

1
2
10.28.10.218 tomcat1.vip.com
10.28.10.218 tomcat2.vip.com

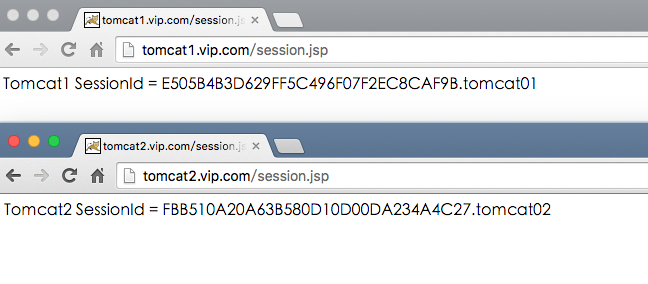
从以上访问结果来看,浏览器的请求会分别引导到了tomcat1和tomcat2上。


观点仅代表自己,期待你的留言。

linux-strace跟踪运行中进程对系统资源的访问

简介

strace常用来跟踪进程执行时的系统调用和所接收的信号。 在Linux世界,进程不能直接访问硬件设备,当进程需要访问硬件设备(比如读取磁盘文件,接收网络数据等等)时,必须由用户态模式切换至内核态模式,通 过系统调用访问硬件设备。strace可以跟踪到一个进程产生的系统调用,包括参数,返回值,执行消耗的时间。

输出参数含义

1
2
3
4
5
6
7
8
9
10
11
12
13
14
15
16
17
root@ubuntu:/usr# strace cat /dev/null
execve("/bin/cat", ["cat", "/dev/null"], [/* 22 vars */]) = 0
brk(0) = 0xab1000
access("/etc/ld.so.nohwcap", F_OK) = -1 ENOENT (No such file or directory)
mmap(NULL, 8192, PROT_READ|PROT_WRITE, MAP_PRIVATE|MAP_ANONYMOUS, -1, 0) = 0x7f29379a7000
access("/etc/ld.so.preload", R_OK) = -1 ENOENT (No such file or directory)
...
brk(0) = 0xab1000
brk(0xad2000) = 0xad2000
fstat(1, {st_mode=S_IFCHR|0620, st_rdev=makedev(136, 0), ...}) = 0
open("/dev/null", O_RDONLY) = 3
fstat(3, {st_mode=S_IFCHR|0666, st_rdev=makedev(1, 3), ...}) = 0
read(3, "", 32768) = 0
close(3) = 0
close(1) = 0
close(2) = 0
exit_group(0) = ?

每一行都是一条系统调用,等号左边是系统调用的函数名及其参数,右边是该调用的返回值。
strace 显示这些调用的参数并返回符号形式的值。strace 从内核接收信息,而且不需要以任何特殊的方式来构建内核。

strace参数

1
2
3
4
5
6
7
8
9
10
11
12
13
14
15
16
17
18
19
20
21
22
23
24
25
26
27
28
29
30
31
32
33
34
35
36
37
38
39
40
41
42
43
44
45
46
47
48
49
50
51
52
53
54
55
56
-c 统计每一系统调用的所执行的时间,次数和出错的次数等.
-d 输出strace关于标准错误的调试信息.
-f 跟踪由fork调用所产生的子进程.
-ff 如果提供-o filename,则所有进程的跟踪结果输出到相应的filename.pid中,pid是各进程的进程号.
-F 尝试跟踪vfork调用.在-f时,vfork不被跟踪.
-h 输出简要的帮助信息.
-i 输出系统调用的入口指针.
-q 禁止输出关于脱离的消息.
-r 打印出相对时间关于,,每一个系统调用.
-t 在输出中的每一行前加上时间信息.
-tt 在输出中的每一行前加上时间信息,微秒级.
-ttt 微秒级输出,以秒了表示时间.
-T 显示每一调用所耗的时间.
-v 输出所有的系统调用.一些调用关于环境变量,状态,输入输出等调用由于使用频繁,默认不输出.
-V 输出strace的版本信息.
-x 以十六进制形式输出非标准字符串
-xx 所有字符串以十六进制形式输出.
-a column
设置返回值的输出位置.默认 为40.
-e expr
指定一个表达式,用来控制如何跟踪.格式如下:
[qualifier=][!]value1[,value2]...
qualifier只能是 trace,abbrev,verbose,raw,signal,read,write其中之一.value是用来限定的符号或数字.默认的 qualifier是 trace.感叹号是否定符号.例如:
-eopen等价于 -e trace=open,表示只跟踪open调用.而-etrace!=open表示跟踪除了open以外的其他调用.有两个特殊的符号 all 和 none.
注意有些shell使用!来执行历史记录里的命令,所以要使用\\.
-e trace=set
只跟踪指定的系统 调用.例如:-e trace=open,close,rean,write表示只跟踪这四个系统调用.默认的为set=all.
-e trace=file
只跟踪有关文件操作的系统调用.
-e trace=process
只跟踪有关进程控制的系统调用.
-e trace=network
跟踪与网络有关的所有系统调用.
-e strace=signal
跟踪所有与系统信号有关的 系统调用
-e trace=ipc
跟踪所有与进程通讯有关的系统调用
-e abbrev=set
设定 strace输出的系统调用的结果集.-v 等与 abbrev=none.默认为abbrev=all.
-e raw=set
将指 定的系统调用的参数以十六进制显示.
-e signal=set
指定跟踪的系统信号.默认为all.如 signal=!SIGIO(或者signal=!io),表示不跟踪SIGIO信号.
-e read=set
输出从指定文件中读出 的数据.例如:
-e read=3,5
-e write=set
输出写入到指定文件中的数据.
-o filename
将strace的输出写入文件filename
-p pid
跟踪指定的进程pid.
-s strsize
指定输出的字符串的最大长度.默认为32.文件名一直全部输出.
-u username
以username 的UID和GID执行被跟踪的命令

命令实例

通用的完整用法:

1
strace -o output.txt -T -tt -e trace=all -p 28979

上面的含义是 跟踪28979进程的所有系统调用(-e trace=all),并统计系统调用的花费时间,以及开始时间(并以可视化的时分秒格式显示),最后将记录结果存在output.txt文件里面。

限制strace只跟踪特定的系统调用

如果你已经知道你要找什么,你可以让strace只跟踪一些类型的系统调用。例如,你需要看看在configure脚本里面执行的程序,你需要监视的系统调 用就是execve。让strace只记录execve的调用用这个命令:

1
strace -f -o configure-strace.txt -e execve ./configure

精品博文转自: http://www.cnblogs.com/ggjucheng/archive/2012/01/08/2316692.html

Nginx+tomcat+redis集群之session跟踪(nginx_upstream_jvm_route)

实验环境

CentOS7, Tomcat7(tomcat-1, tomcat-2), Nginx1.8.1, redis3.0.7

tomcat1:Server port=”8105”,Connector port=”8081”,ajp Connector port=”8109”

tomcat2:Server port=”8205”,Connector port=”8082”,ajp Connector port=”8209”

集群环境下tomcat的session处理方式

一、upstream ip_hash(不推荐使用)

nginx中的ip_hash技术能够将某个ip的请求定向到同一台后端,这样一来这个ip下的某个客户端和某个后端就能建立起稳固的session,ip_hash是在upstream配置中定义的:

1
2
3
4
5
upstream backend { 
server 127.0.0.1:8081 ;
server 127.0.0.1:8082 ;
ip_hash;
}

不推荐使用的原因如下:

  • nginx不是最前端的服务器。 ip_hash要求nginx一定是最前端的服务器,否则nginx得不到正确ip,就不能根据ip作hash。譬如使用的是squid为最前端,那么nginx取ip时只能得到squid的服务器ip地址,用这个地址来作分流是肯定错乱的。
  • nginx的后端还有其它方式的负载均衡。
    假如nginx后端又有其它负载均衡,将请求又通过另外的方式分流了,那么某个客户端的请求肯定不能定位到同一台session应用服务器上。
  • 多个外网出口。
    很多公司上网有多个出口,多个ip地址,用户访问互联网时候自动切换ip。而且这种情况不在少数。使用 ip_hash 的话对这种情况的用户无效,无法将某个用户绑定在固定的tomcat上 。

    二、nginx_upstream_jvm_route (nginx module, 无法故障转移)

    nginx_upstream_jvm_route 是一个nginx的扩展模块,用来实现基于 Cookie 的 Session Sticky 的功能。

简单来说,它是基于cookie中的JSESSIONID来决定将请求发送给后端的哪个server,nginx_upstream_jvm_route会在用户第一次请求后端server时,将响应的server标识绑定到cookie中的JSESSIONID中,从而当用户发起下一次请求时,nginx会根据JSESSIONID来决定由哪个后端server来处理。

但是当客户端对应的tomcat挂掉之后,客户端的请求将不能通过其它tomcat代替进行处理,也就是说 __nginx_upstream_jvm_route不支持故障转移__。

三、tomcat-redis-session-manager (java lib, 推荐使用)

通过集群实例tomcat连接到同一个redis,将sessionID存储在redis中完成session共享。由于session共享,所以支持故障转移。

详见我的另一篇博文《Nginx+tomcat+redis集群之session共享》

nginx_upstream_jvm_route安装配置

github地址:https://github.com/nulab/nginx-upstream-jvm-route

安装方法如下:

1
2
3
4
5
6
7
8
9
10
11
12
13
14
15
16
17
18
19
20
21
22
23
24
25
26
27
28
29
30
31
32
[root@localhost ~]# git clone https://github.com/nulab/nginx-upstream-jvm-route.git
[root@localhost ~]# cd nginx-1.8.1 //注意:一定是进入到nginx安装目录打补丁
[root@localhost nginx-1.8.1]# patch -p0 < ../nginx-upstream-jvm-route/jvm_route.patch
patching file src/http/ngx_http_upstream.c
Hunk #1 succeeded at 5281 (offset 672 lines).
Hunk #2 succeeded at 5380 (offset 678 lines).
Hunk #3 succeeded at 5397 (offset 656 lines).
Hunk #4 succeeded at 5434 (offset 656 lines).
Hunk #5 succeeded at 5467 (offset 656 lines).
Hunk #6 succeeded at 5527 (offset 671 lines).
patching file src/http/ngx_http_upstream.h
Hunk #1 succeeded at 96 (offset 4 lines).
Hunk #2 succeeded at 110 (offset 4 lines).
[root@localhost nginx-1.8.1]# ./configure --with-pcre=../pcre-8.38 --with-zlib=../zlib-1.2.8 --with-http_gzip_static_module --with-http_ssl_module --add-module=../nginx_tcp_proxy_module/ \--add-module=../nginx_upstream_check_module/ \--add-module=../nginx-module-vts/ \--add-module=../nginx-upstream-jvm-route/
[root@localhost nginx-1.8.1]# make
[root@localhost nginx-1.8.1]# mv /usr/local/nginx/sbin/nginx /usr/local/nginx/sbin/nginx.old
mv:是否覆盖"/usr/local/nginx/sbin/nginx.old"? y
[root@localhost nginx-1.8.1]# cp objs/nginx /usr/local/nginx/sbin/
[root@localhost nginx-1.8.1]# make upgrade
/usr/local/nginx/sbin/nginx -t
nginx: the configuration file /usr/local/nginx/conf/nginx.conf syntax is ok
nginx: configuration file /usr/local/nginx/conf/nginx.conf test is successful
kill -USR2 `cat /usr/local/nginx/logs/nginx.pid`
sleep 1
test -f /usr/local/nginx/logs/nginx.pid.oldbin
kill -QUIT `cat /usr/local/nginx/logs/nginx.pid.oldbin`
[root@localhost nginx-1.8.1]# /usr/local/nginx/sbin/nginx -V
nginx version: nginx/1.8.1
built by gcc 4.8.5 20150623 (Red Hat 4.8.5-4) (GCC)
built with OpenSSL 1.0.1e-fips 11 Feb 2013
TLS SNI support enabled
configure arguments: --with-pcre=../pcre-8.38 --with-zlib=../zlib-1.2.8 --with-http_gzip_static_module --with-http_ssl_module --add-module=../nginx_tcp_proxy_module/ --add-module=../nginx_upstream_check_module/ --add-module=../nginx-module-vts/ --add-module=../nginx-upstream-jvm-route/

配置nginx.conf

1
2
3
4
5
6
7
8
9
10
11
12
13
14
15
16
17
18
19
20
21
http {
upstream tomcats_jvm_route {
server 127.0.0.1:8081 srun_id=tomcat01;
server 127.0.0.1:8082 srun_id=tomcat02;
jvm_route $cookie_JSESSIONID|sessionid reverse;
}
server {
#....原有配置.....
location ~ .*\.(do|jsp|action)?$ {
proxy_redirect off;
proxy_set_header Host $host;
proxy_set_header X-Real-IP $remote_addr;
proxy_set_header X-Forwarded-For $proxy_add_x_forwarded_for;
root html;
index index.html index.htm;
#proxy_pass http://tomcat;
proxy_pass http://tomcats_jvm_route;
}
#....原有配置.....
}
}

修改tomcat的server.xml配置:

1
2
<Engine name="Catalina" defaultHost="localhost" jvmRoute="tomcat01">
<Engine name="Catalina" defaultHost="localhost" jvmRoute="tomcat02">

验证生效

1
2
3
4
5
6
7
8
9
10
11
12
13
14
15
16
17
18
19
20
21
22
23
[root@localhost ~]# ps -ef |grep tomcat|grep -v grep|awk '{print $2}'
19914
20029
[root@localhost ~]# ps -ef |grep tomcat|grep -v grep|awk '{print $2}'|xargs kill
[root@localhost ~]# ps -ef |grep tomcat|grep -v grep|awk '{print $2}'
[root@localhost ~]# cd tomcat-1/
[root@localhost tomcat-1]# ./bin/startup.sh
Using CATALINA_BASE: /root/tomcat-1
Using CATALINA_HOME: /root/tomcat-1
Using CATALINA_TMPDIR: /root/tomcat-1/temp
Using JRE_HOME: /usr/local/jdk1.7.0_60
Using CLASSPATH: /root/tomcat-1/bin/bootstrap.jar:/root/tomcat-1/bin/tomcat-juli.jar
Tomcat started.
[root@localhost tomcat-1]# cd ../tomcat-2
-bash: cd: tomcat-2: 没有那个文件或目录
[root@localhost tomcat-2]# ./bin/startup.sh
Using CATALINA_BASE: /root/tomcat-1
Using CATALINA_HOME: /root/tomcat-1
Using CATALINA_TMPDIR: /root/tomcat-1/temp
Using JRE_HOME: /usr/local/jdk1.7.0_60
Using CLASSPATH: /root/tomcat-1/bin/bootstrap.jar:/root/tomcat-1/bin/tomcat-juli.jar
Tomcat started.
[root@localhost tomcat-2]# /usr/local/nginx/sbin/nginx -t;/usr/local/nginx/sbin/nginx -s reload;


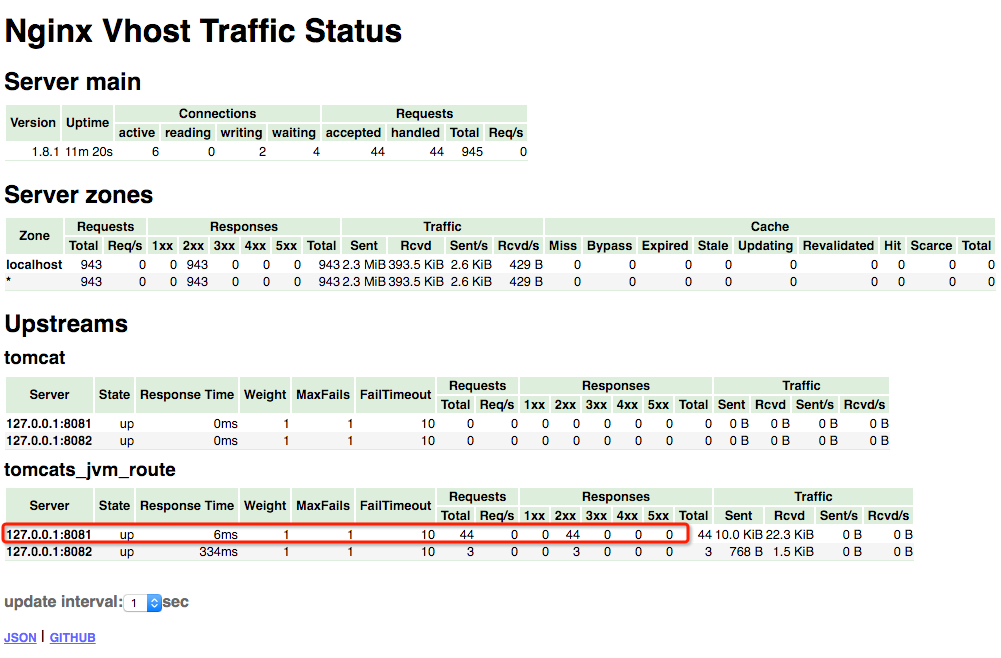
从上图的结果来看:

  • 1: sessionID的后面增加了第一个为客户端服务的最终tomcat实例标识。
  • 2: 在不停的刷新页面的时候都是同一个tomcat实例返回的页面。从vts的监控图可以看出,请求都被导流到同一个tomcat实例上。
  • 3: 在停止tomcat1后,再对浏览器进行刷新操作,发现请求被导到tomcat2上,但对应的sessionId也发生了变化,说明服务器端认定这是一个新的客户端进行的请求操作。验证了我之前所说,__这种方式不支持故障转移__。

观点仅代表自己,期待你的留言。

Nginx+tomcat+redis集群之session共享

实验环境

CentOS7, Tomcat7(tomcat-1, tomcat-2), Nginx1.8.1, redis3.0.7

安装redis与tomcat

1
2
3
4
5
6
7
[root@localhost ~]# wget http://download.redis.io/releases/redis-3.0.7.tar.gz
[root@localhost ~]# wget http://mirror.nus.edu.sg/apache/tomcat/tomcat-7/v7.0.68/bin/apache-tomcat-7.0.68.tar.gz
[root@localhost ~]# tar -xvf redis-3.0.7.tar.gz; cd redis-3.0.7
[root@localhost redis-3.0.7]# make && make install
[root@localhost redis-3.0.7]# redis-server & //运行redis服务
[root@localhost ~]# tar -xvf apache-tomcat-7.0.68.tar.gz
[root@localhost ~]# mv apache-tomcat-7.0.68 tomcat-1; cp -r tomcat-1 tomcat-2

在tomcat-1和tomcat-2的webapps/ROOT目录下新增一个名叫session.jsp的文件,内容如下:

1
2
<%@ page  %>
Tomcat1(tomcat-2中为Tomcat2) SessionId = <%=session.getId() %>

修改tomcat与nginx配置

架设场景如下图:

架设场景

  • 修改tomcat端口(conf/server.xml)

tomcat1:Server port=”8105”,Connector port=”8081”,ajp Connector port=”8109”

tomcat2:Server port=”8205”,Connector port=”8082”,ajp Connector port=”8209”

  • 修改nginx配置,以随机访问的方式将请求引入后端的tomcat集群中
    1
    2
    3
    4
    5
    6
    7
    8
    9
    10
    11
    12
    13
    14
    15
    16
    17
    18
    19
    20
    21
    22
    23
    24
    25
    26
    27
    28
    29
    30
    31
    http {
    upstream tomcat {
    server 127.0.0.1:8081;
    server 127.0.0.1:8082;
    }
    server {
    listen 80;
    server_name localhost;
    #charset koi8-r;
    #access_log logs/host.access.log main;
    location ~ .*\.(do|jsp|action)?$ {
    proxy_redirect off;
    proxy_set_header Host $host;
    proxy_set_header X-Real-IP $remote_addr;
    proxy_set_header X-Forwarded-For $proxy_add_x_forwarded_for;
    root html;
    index index.html index.htm;
    proxy_pass http://tomcat;
    }
    #配置Nginx动静分离,定义的静态页面直接从Nginx发布目录读取。
    location ~ .*\.(html|htm|gif|jpg|jpeg|bmp|png|ico|txt|js|css)$ {
    root /data/;
    gzip_static on; #开启压缩静态资源
    }

    location / {
    root html;
    index index.html index.htm;
    }
    }
    }
    然后访问http://10.28.10.218/session.jsp 可以看到服务器随机返回给我们两个tomcat的session页面。同时我们也可以看到SessionId在不停的变化。

Tomcat1的session.jsp

Tomcat2的session.jsp

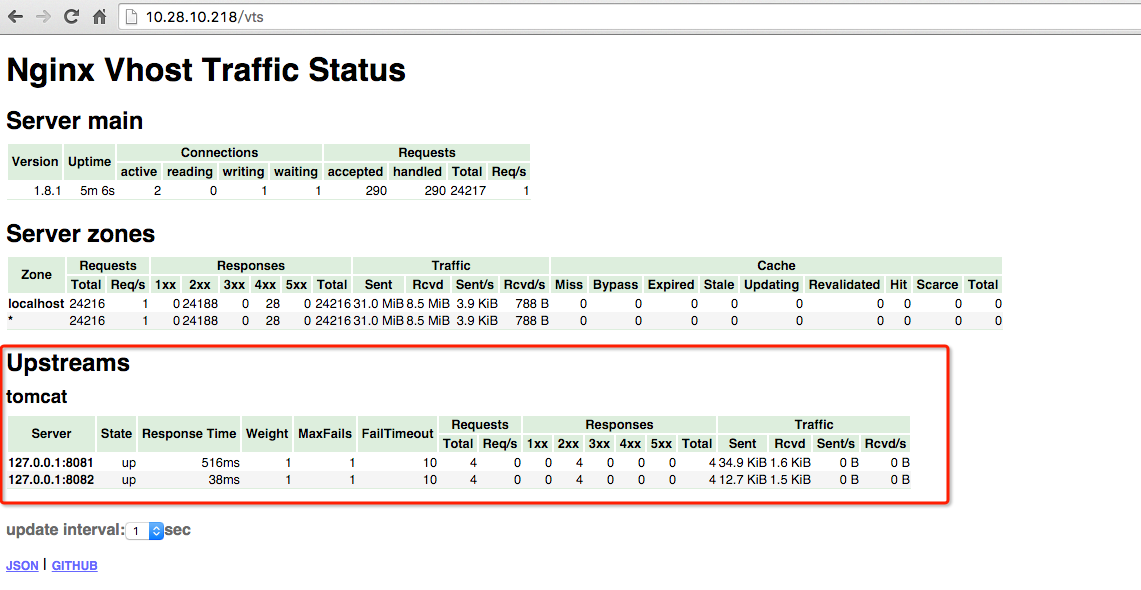
通过Nginx的监控页也可以看出请求被随机的转发到了tomcat中

Nginx的监控页

将tomcat的session都存储到redis中

Tomcat存储到Redis库项目地址:https://github.com/jcoleman/tomcat-redis-session-manager
从gradle配置上看,此项目还有三个依赖库。通过gradle进行编译,最终会自动从网络下载commons-pool,commons-pool2,jedis库并编译生成tomcat-redis-session-manager。

1
2
3
4
5
6
7
8
9
10
11
12
dependencies {
compile group: 'org.apache.tomcat', name: 'tomcat-catalina', version: '7.0.27'
compile group: 'redis.clients', name: 'jedis', version: '2.5.2'
compile group: 'org.apache.commons', name: 'commons-pool2', version: '2.2'
//compile group: 'commons-codec', name: 'commons-codec', version: '1.9'

testCompile group: 'junit', name: 'junit', version: '4.+'
testCompile 'org.hamcrest:hamcrest-core:1.3'
testCompile 'org.hamcrest:hamcrest-library:1.3'
testCompile 'org.mockito:mockito-all:1.9.5'
testCompile group: 'org.apache.tomcat', name: 'tomcat-coyote', version: '7.0.27'
}

觉得麻烦的同学可以直接下载以下库,放入到tomcat/lib下:
commons-pool-1.5.5.jar
commons-pool2-2.2.jar
jedis-2.0.0.jar
tomcat-redis-session-manager-1.2-tomcat-7-1.2.jar

按tomcat-redis-session-manager在github上地址里的说明修改两个tomcat的context.xml(tomcat/conf/context.xml)增加存储配置

1
2
3
4
5
6
7
8
9
<Valve className="com.radiadesign.catalina.session.RedisSessionHandlerValve" />
<Manager className="com.radiadesign.catalina.session.RedisSessionManager"
host="localhost" <!-- optional: defaults to "localhost" -->
port="6379" <!-- optional: defaults to "6379" -->
database="0" <!-- optional: defaults to "0" -->
maxInactiveInterval="60" <!-- optional: defaults to "60" (in seconds) -->
sessionPersistPolicies="PERSIST_POLICY_1,PERSIST_POLICY_2,.." <!-- optional -->
sentinelMaster="SentinelMasterName" <!-- optional -->
sentinels="sentinel-host-1:port,sentinel-host-2:port,.." />

修改好配置后,启动tomcat-1和tomcat-2。再访问session.jsp时你会发现无论是从哪一个tomcat返回的页面同一个客户端的sessionID都是相同的,这就达到了session在集群tomcat下共享的目的。

通过redis-cli命令连接到redis服务器,可以看到对应sessionID的数据已存储到了redis中。

提醒:session的超时时间由context.xml中的maxInactiveInterval配置,默认60秒


观点仅代表自己,期待你的留言。

Nginx不停止服务下升级与Nginx服务监控

一、文章目的

本文以添加新模块”ngx_http_stub_status_module”为例介绍Nginx如果在不停止服务的情况下进行升级。

二、Nginx升级

先查看一下目前现在模块:

1
2
3
4
5
6
[root@localhost sbin]# ./nginx -V
nginx version: nginx/1.8.1
built by gcc 4.8.5 20150623 (Red Hat 4.8.5-4) (GCC)
built with OpenSSL 1.0.1e-fips 11 Feb 2013
TLS SNI support enabled
configure arguments: --with-pcre=../pcre-8.38 --with-zlib=../zlib-1.2.8 --with-http_gzip_static_module --with-http_ssl_module --add-module=../nginx_tcp_proxy_module/ --add-module=../nginx_upstream_check_module/ --add-module=../nginx-module-vts/

进入到nginx源码目录(或者直接从网络上下载。参见博文[ Nginx在CentOS7上源码编译安装 ]),编译时增加所需添加的模块:

1
2
3
[root@localhost nginx-1.8.1]# cd ~/nginx-1.8.1
[root@localhost nginx-1.8.1]# ./configure --with-pcre=../pcre-8.38 --with-zlib=../zlib-1.2.8 --with-http_gzip_static_module --with-http_stub_status_module --with-http_ssl_module --add-module=../nginx_tcp_proxy_module/ \--add-module=../nginx_upstream_check_module/ \--add-module=../nginx-module-vts/
[root@localhost nginx-1.8.1]# make

将编译出的objs目录下及nginx运行文件直接copy到原nginx目录(注意备份):

1
2
3
4
5
6
7
8
9
10
11
12
13
14
15
16
[root@localhost nginx-1.8.1]# mv /usr/local/nginx/sbin/nginx /usr/local/nginx/sbin/nginx.old
[root@localhost nginx-1.8.1]# cp objs/nginx /usr/local/nginx/sbin/
[root@localhost nginx-1.8.1]# make upgrade
/usr/local/nginx/sbin/nginx -t
nginx: the configuration file /usr/local/nginx/conf/nginx.conf syntax is ok
nginx: configuration file /usr/local/nginx/conf/nginx.conf test is successful
kill -USR2 `cat /usr/local/nginx/logs/nginx.pid`
sleep 1
test -f /usr/local/nginx/logs/nginx.pid.oldbin
kill -QUIT `cat /usr/local/nginx/logs/nginx.pid.oldbin`
[root@localhost sbin]# ./nginx -V
nginx version: nginx/1.8.1
built by gcc 4.8.5 20150623 (Red Hat 4.8.5-4) (GCC)
built with OpenSSL 1.0.1e-fips 11 Feb 2013
TLS SNI support enabled
configure arguments: --with-pcre=../pcre-8.38 --with-zlib=../zlib-1.2.8 --with-http_gzip_static_module --with-http_stub_status_module --with-http_ssl_module --add-module=../nginx_tcp_proxy_module/ --add-module=../nginx_upstream_check_module/ --add-module=../nginx-module-vts/

从以上的输出信息来看,nginx已经成功添加了http_stub_status_module模块。接下来,我们进行验证。

验证ngx_http_stub_status_module模块是否生效

在conf/nginx.conf的server节点下添加

1
2
3
location /status {
stub_status;
}

重新load一下nginx配置

1
2
3
[root@localhost sbin]# ./nginx -t;./nginx -s reload
nginx: the configuration file /usr/local/nginx/conf/nginx.conf syntax is ok
nginx: configuration file /usr/local/nginx/conf/nginx.conf test is successful

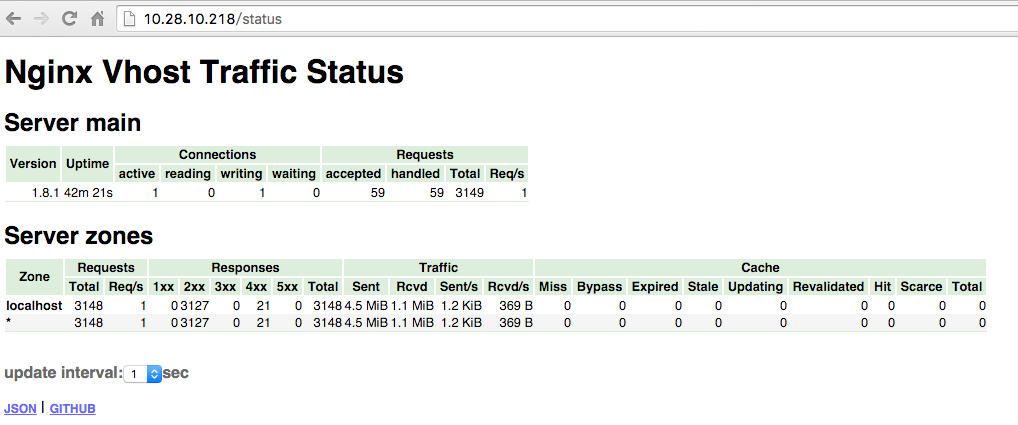
然后通过浏览器访问http://10.28.10.218/status 就可以看到nginx的运行状态已经通过界面的方式显示出来了。

由于http_stub_status_module模块监控的状态项非常有限,建议使用nginx-module-vts模块对nginx进行更全面的运行状态监控。
Nginx VTS

nginx.conf

1
2
3
4
5
6
7
8
9
http {
vhost_traffic_status_zone;
server {
location /vts {
vhost_traffic_status_display;
vhost_traffic_status_display_format html;
}
}
}

三、提高nginx监控页面的安全性

由于nginx的运行状态为非常重要的数据,所以只允许有特定权限的人员才能有权访问,所以我们可以通过http_auth_basic_module模块来进行身份的验证。更为关键的是http_auth_basic_module模块默认已安装。

通过“yum provides *bin/htpasswd”查看哪个库中有htpasswd命令,安装账户生成命令htpasswd,并添加一个用户admin

1
2
3
4
5
6
7
8
9
10
11
12
13
14
15
16
17
18
19
20
21
[root@localhost nginx-1.8.1]# yum provides \*bin/htpasswd
已加载插件:fastestmirror
Loading mirror speeds from cached hostfile
* base: mirrors.sina.cn
* epel: ftp.cuhk.edu.hk
* extras: mirrors.sina.cn
* updates: mirrors.sina.cn
base/7/x86_64/filelists_db | 6.2 MB 00:00:01
httpd-tools-2.4.6-40.el7.centos.x86_64 : Tools for use with the Apache HTTP Server
源 :base
匹配来源:
文件名 :/usr/bin/htpasswd


[root@localhost nginx-1.8.1]# yum install httpd-tools
[root@localhost nginx-1.8.1]# whereis htpasswd //查看是否安装成功
htpasswd: /usr/bin/htpasswd /usr/share/man/man1/htpasswd.1.gz
[root@localhost nginx]# htpasswd -c ./nginx.auth admin //在nginx目录下会生成一个nginx.auth文件来存储账户信息,第二次添加用户就不需要加-c的参数了
New password:
Re-type new password:
Adding password for user admin

在conf/nginx.conf的location status节点内添加以下身份验证配置

1
2
3
4
5
6
7
8
9
10
11
http {
vhost_traffic_status_zone;
server {
location /vts {
auth_basic "Restricted";
auth_basic_user_file ../nginx.auth;
vhost_traffic_status_display;
vhost_traffic_status_display_format html;
}
}
}

重新热更新一下配置,再次通过浏览器访问时就会弹框提示你输入用户名和密码了。

1
2
3
[root@localhost sbin]# ./nginx -t;./nginx -s reload
nginx: the configuration file /usr/local/nginx/conf/nginx.conf syntax is ok
nginx: configuration file /usr/local/nginx/conf/nginx.conf test is successful

Nginx Auth


观点仅代表自己,期待你的留言。

Nginx在CentOS7上源码编译安装

下载Nginx源码及依赖库

1
2
3
4
[root@localhost ~]# wget http://nginx.org/download/nginx-1.8.1.tar.gz
[root@localhost ~]# yum install -y gcc gcc-c++
[root@localhost ~]# wget http://jaist.dl.sourceforge.net/project/pcre/pcre/8.38/pcre-8.38.tar.gz
[root@localhost ~]# wget http://zlib.net/zlib-1.2.8.tar.gz

下载Nginx模块

Nginx官网所有模块列表 http://nginx.org/en/docs/

1
2
3
4
[root@localhost ~]# yum -y install openssl openssl-devel
[root@localhost ~]# git clone https://github.com/vozlt/nginx-module-vts.git
[root@localhost ~]# git clone https://github.com/yaoweibin/nginx_tcp_proxy_module.git
[root@localhost ~]# git clone https://github.com/yaoweibin/nginx_upstream_check_module.git

编译安装Nginx

1
2
3
4
5
6
7
8
9
10
11
12
13
14
15
16
17
[root@localhost ~]# tar xvf nginx-1.8.1.tar.gz
[root@localhost ~]# tar xvf pcre-8.38.tar.gz
[root@localhost ~]# tar xvf zlib-1.2.8.tar.gz
[root@localhost ~]# cd nginx-1.8.1
[root@localhost nginx-1.8.1]# patch -p1 < ../nginx_tcp_proxy_module/tcp.patch
[root@localhost nginx-1.8.1]# patch -p1 < ../nginx_upstream_check_module/check_1.7.5+.patch //按nginx版本来执行不同的补丁文件
[root@localhost nginx-1.8.1]# ./configure --with-pcre=../pcre-8.38 --with-zlib=../zlib-1.2.8 --with-http_gzip_static_module --with-http_ssl_module --add-module=../nginx_tcp_proxy_module/ \--add-module=../nginx_upstream_check_module/ \--add-module=../nginx-module-vts/
[root@localhost nginx-1.8.1]# make
[root@localhost nginx-1.8.1]# make install
[root@localhost nginx-1.8.1]# /usr/local/nginx/sbin/nginx -V
nginx version: nginx/1.8.1
built by gcc 4.8.5 20150623 (Red Hat 4.8.5-4) (GCC)
built with OpenSSL 1.0.1e-fips 11 Feb 2013
TLS SNI support enabled
configure arguments: --with-pcre=../pcre-8.38 --with-zlib=../zlib-1.2.8 --with-http_gzip_static_module --with-http_ssl_module --add-module=../nginx_tcp_proxy_module/ --add-module=../nginx_upstream_check_module/ --add-module=../nginx-module-vts/
[root@localhost nginx-1.8.1]# /usr/local/nginx/sbin/nginx
[root@localhost nginx-1.8.1]# systemctl stop firewalld.service //关闭防火墙,开放访问端口80

Nginx Welcome

nginx安装目录默认为: /usr/local/nginx, 可通过在configure时增加–prefix=”path”来更改。

nginx启动时默认用户及用户组设置:

  • 通过在configure时增加–user=”user name”和–group=”group name”来更改。
  • 在nginx.conf里增加user “user name” “group name”来更改。

注意: 在configure时如需添加多个第三方module时,从第二个–add-module开始,在之前需要加“\”


观点仅代表自己,期待你的留言。

关于电商系统业务模块猜想

电商四大体系
  • 企业信息化
  • 电商网络体系
  • 线上监控体系
  • 数据分析体系

电商四大体系

电商业务模块

经过与朋友们的讨论,笔者着手总结电商应包含的模块如下:

电商业务模块总览

笔者认为电商门户建设应从企业信息化建设入手,逐步加入电商元素,最终形成企业电商。


观点仅代表自己,期待你的留言。