Clone开源项目到私有Git服务器

内容

  1. 在clone的工程下增加私有仓库地址:git remote add PrivateRepo http://xxx/repo/myproj.git
  2. 从私有仓库checkout分支到本地: git checkout PrivateRepo/master
  3. 从远端仓库分支合并代码到私有仓库分支: git merge master --allow-unrelated-histories
  4. push代码: git push

观点仅代表自己,期待你的留言。

Ubuntu下切换jdk版本

安装新版本jdk和切换

1
2
wujianjun@wujianjun-work:~$ update-alternatives --install /usr/bin/java java /opt/jdk1.8.0_111/bin/java 300
wujianjun@wujianjun-work:~$ update-alternatives --config java

在profile上修改JAVA_HOME的指向目录

profile文件在两处, /etc/profile~/.profile

1
2
export JAVA_HOME=/opt/jdk1.8.0_111
export PATH=$JAVA_HOME/bin:$PATH

观点仅代表自己,期待你的留言。

Podman系列之通过Maven插件dockerfile-maven-plugin完成镜像打包

pom中添加插件

1
2
3
4
5
6
7
8
9
10
11
12
13
14
15
16
17
18
19
20
21
22
<plugin>
<groupId>com.spotify</groupId>
<artifactId>dockerfile-maven-plugin</artifactId>
<version>1.4.13</version>
<executions>
<execution>
<id>default</id>
<goals>
<goal>build</goal>
<goal>push</goal>
</goals>
</execution>
</executions>
<configuration>
<repository>myrepo.gpluslife.com/${project.artifactId}</repository>
<tag>${project.version}</tag>
<useMavenSettingsForAuth>true</useMavenSettingsForAuth>
<buildArgs>
<MODULE_FILE_NAME>${project.build.finalName}</MODULE_FILE_NAME>
</buildArgs>
</configuration>
</plugin>

打包镜像

1
wujianjun@wujianjun-work:~$ clean package -U  -Dmaven.test.skip=true

通过在Dockerfile文件所在目录执行以上命令成功后,则会自动在远程podman服务端创建镜像

1
2
3
4
5
wujianjun@wujianjun-work:~$ podman images
REPOSITORY TAG IMAGE ID CREATED SIZE
myrepo.gpluslife.com/service-gateway-biz 1.0.0-SNAPSHOT aa26ce31b312 20 seconds ago 294 MB
docker.io/library/nginx 1.20.1 3456bc6a1c48 3 weeks ago 137 MB
docker.io/adoptopenjdk/openjdk8 x86_64-ubuntu-jre8u292-b10 48b3b187af57 5 weeks ago 229 MB

常见问题

  1. mvn package时抛错
1
2
3
4
5
6
[INFO] I/O exception (java.io.IOException) caught when processing request to {}->unix://localhost:80: No such file or directory
[INFO] Retrying request to {}->unix://localhost:80
[INFO] I/O exception (java.io.IOException) caught when processing request to {}->unix://localhost:80: No such file or directory
[INFO] Retrying request to {}->unix://localhost:80
[INFO] I/O exception (java.io.IOException) caught when processing request to {}->unix://localhost:80: No such file or directory
[INFO] Retrying request to {}->unix://localhost:80

根因分析:由于未正确配置DOCKER_HOST环境变量导致走了本机默认的连接地址
解决方案:在环境变量上配置以下地址

1
DOCKER_HOST="tcp://host:2375"

注意:macOS添加环境变量时不同于其他unix或类unix系统(默认使用bash,因此在.bash_profile中设置环境变量);macOS的terminal默认使用的是zsh,在.zshrc中进行配置。

附插件官网地址: https://github.com/spotify/dockerfile-maven


观点仅代表自己,期待你的留言。

Podman系列之通过docker插件完成研发机镜像创建和运行

MacOS连接Linux的Podman REST API service

由于Podman与Docker一样,不支持在windows和macos上运行。故可以通过在linux系统下的podman开启REST API service。由windows与macos进行远程连接。

  1. Linux下开启Podman REST API service

    1
    2
    3
    4
    5
    6
    7
    8
    9
    10
    11
    12
    13
    14
    15
    16
    17
    18
    19
    20
    21
    22
    23
    24
    25
    26
    27
    wujianjun@wujianjun-work:~$ vi /lib/systemd/system/podman.service #增加‘tcp:0.0.0.0:2375 --time=0’开启tcp监听
    [Unit]
    Description=Podman API Service
    Requires=podman.socket
    After=podman.socket
    Documentation=man:podman-system-service(1)
    StartLimitIntervalSec=0

    [Service]
    Delegate=true
    Type=exec
    KillMode=process
    Environment=LOGGING="--log-level=info"
    ExecStart=/usr/bin/podman $LOGGING system service tcp:0.0.0.0:2375 --time=0

    [Install]
    WantedBy=default.target
    wujianjun@wujianjun-work:~$ systemctl daemon-reload
    wujianjun@wujianjun-work:~$ sudo systemctl restart podman
    wujianjun@wujianjun-work:~$ podman --remote info
    host:
    arch: amd64
    buildahVersion: 1.22.3
    cgroupControllers: []
    cgroupManager: cgroupfs
    cgroupVersion: v1
    wujianjun@wujianjun-work:~$ podman system connection list #查看当前机器远程连接的列表

    接下来MacOS或Windows就可以通过tcp://host:2375进行连接了
    MacOS下加入远程访问 wujianjun@wujianjun-work ~ % podman system connection add ubuntu tcp://10.84.102.X:2375

  2. 通过Ideaj下Docker Plug-in完成远程连接

Docker插件远程连接

程序打包

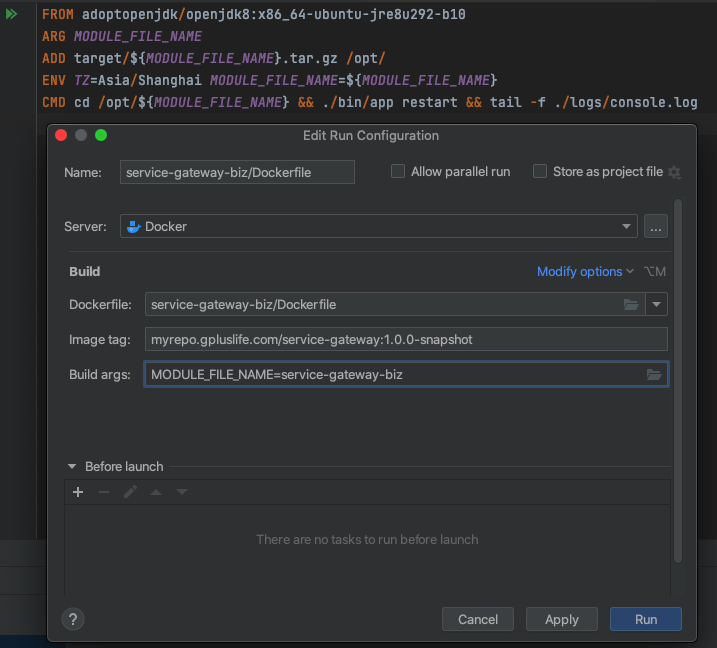
  1. 在需要打包的模块pom.xml的同级目录创建 Dockerfile 文件,内容如下:

    1
    2
    3
    4
    5
    FROM adoptopenjdk/openjdk8:x86_64-ubuntu-jre8u292-b10
    ARG MODULE_FILE_NAME
    ADD target/${MODULE_FILE_NAME}.tar.gz /opt/
    ENV TZ=Asia/Shanghai MODULE_FILE_NAME=${MODULE_FILE_NAME}
    CMD cd /opt/${MODULE_FILE_NAME} && ./bin/app restart && tail -f ./logs/console.log
  2. 在上一步的Docker远程连接下配置打包镜像

Docker远程连接

注意:如果Dockerfile里出现错误(如Add的文件不存在时)会抛出Dockerfile: service-gateway-biz/Dockerfile': Can't retrieve image ID from build stream的错误。

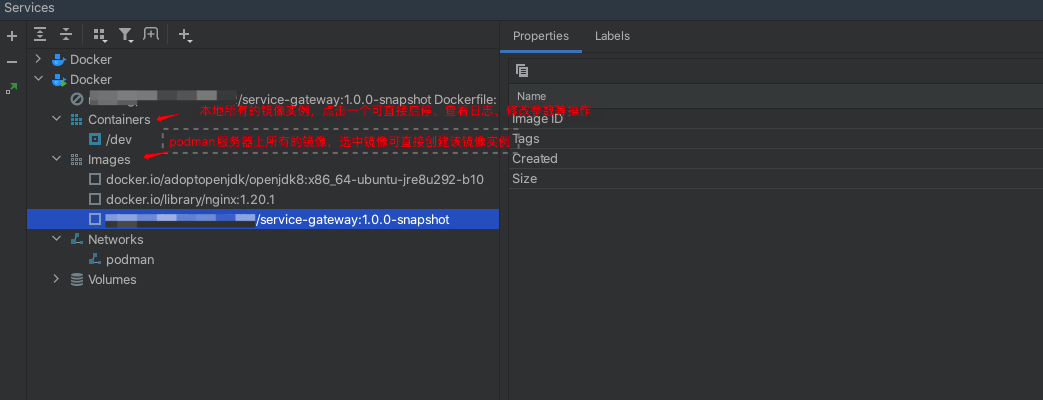
Docker插件使用

Podman远程仓库镜像

通过登录进Podman仓库来看,两边的镜像与运行容器实例是一致的。


观点仅代表自己,期待你的留言。

Podman系列之Nexus3私服搭建与使用

Nexus新建docker仓库

Nexus的仓库分三类

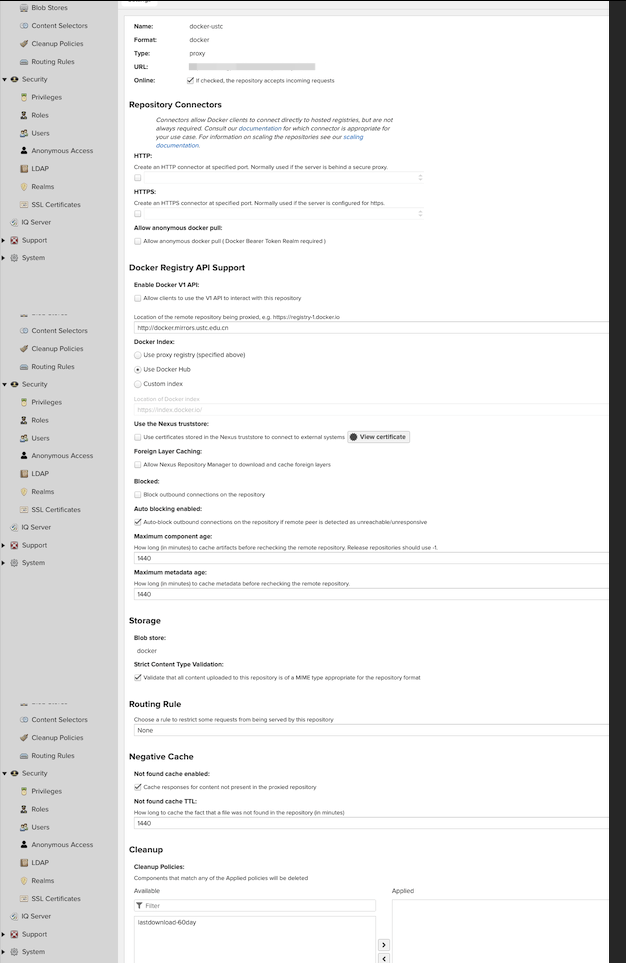
  1. docker(proxy):用于代理其它的hub,类似mirror。
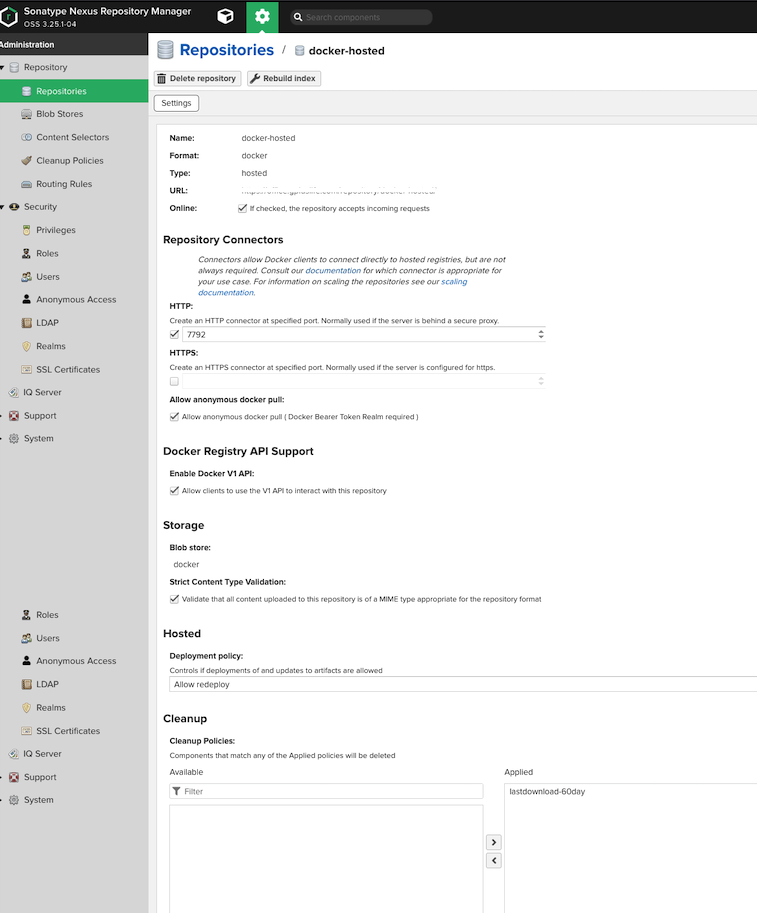
  2. docker(hosted):用于上传本地镜像到仓库。
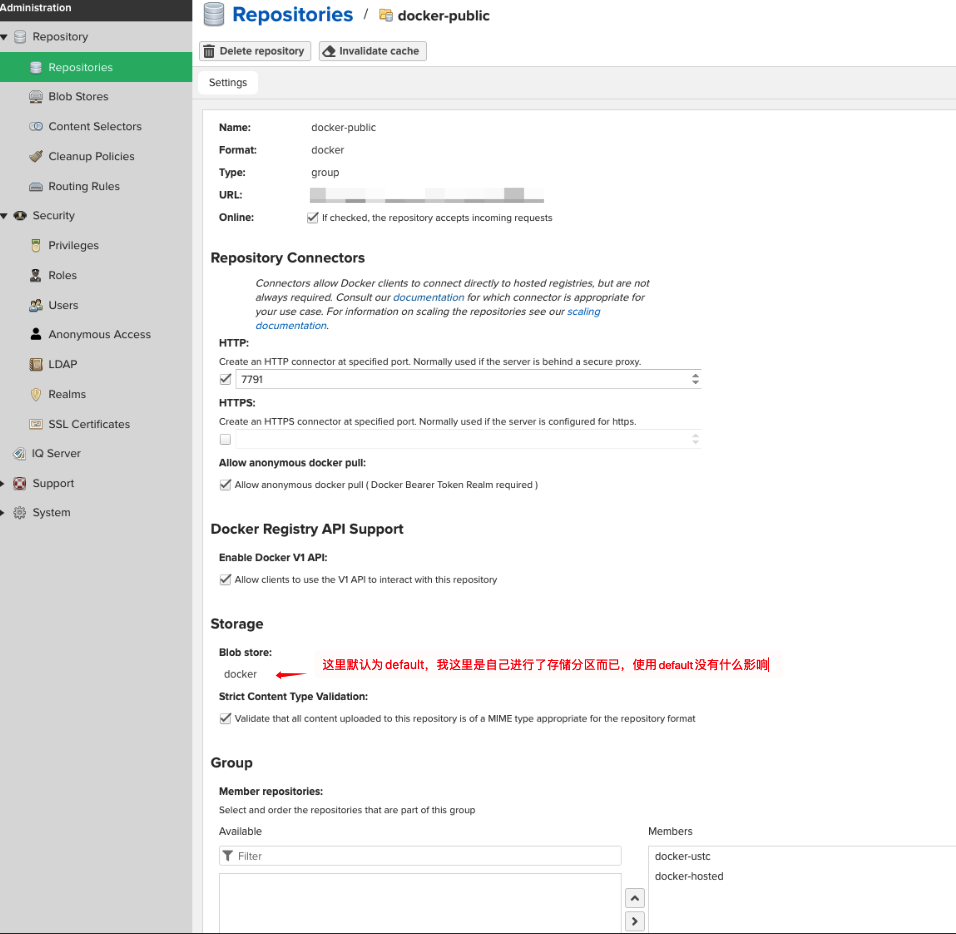
  3. docker(group):可将proxy类型和hosted类型的仓库对外统一访问入口(注意不能使用这个地址进行镜像的上传)。

以下为我的配置:

docker(proxy)
proxy

docker(hosted)
hosted

docker(group)
group

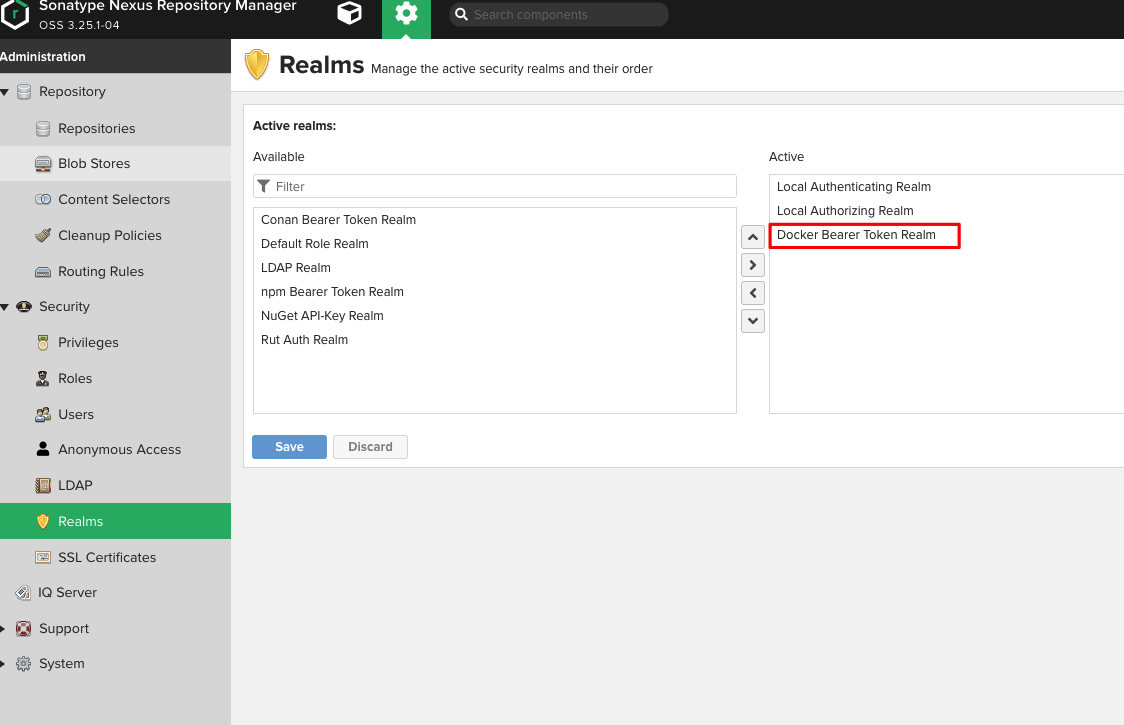
配置权限
realms

国内镜像站

Nginx反向代理docker仓库

1
2
3
4
5
6
7
8
9
10
11
12
13
14
15
16
17
18
19
20
21
22
23
24
25
26
27
28
29
30
31
32
33
34
35
36
37
38
upstream nexus_docker_group {
server 10.84.102.90:7793;
}
upstream nexus_docker_hosted {
server 10.84.102.90:7792;
}
server {
listen 80;
server_name mirror.docker.com;

access_log logs/docker_mirror.log;

client_max_body_size 0;
# required to avoid HTTP 411: see Issue #1486 (https://github.com/docker/docker/issues/1486)
chunked_transfer_encoding on;
# 设置默认使用推送代理
set $upstream "nexus_docker_hosted";
# 当请求是GET,也就是拉取镜像的时候,这里改为拉取代理,如此便解决了拉取和推送的端口统一
if ( $request_method ~* 'GET') {
set $upstream "nexus_docker_group";
}
# 只有本地仓库才支持搜索,所以将搜索请求转发到本地仓库,否则出现500报错
if ($request_uri ~ '/search') {
set $upstream "nexus_docker_group";
}
location / {
proxy_pass http://$upstream;
proxy_set_header Host $http_host;
proxy_connect_timeout 3600;
proxy_send_timeout 3600;
proxy_read_timeout 3600;
proxy_set_header X-Real-IP $remote_addr;
proxy_buffering off;
proxy_request_buffering off;
proxy_set_header X-Forwarded-For $proxy_add_x_forwarded_for;
proxy_set_header X-Forwarded-Proto http;
}
}

podman客户端配置

  1. 注册私服
1
2
3
4
5
6
7
wujianjun@wujianjun-work:~$ vi /etc/containers/registries.conf
`
unqualified-search-registries = ["mirror.docker.com"]
[[registry]]
location = "mirror.docker.com"
insecure = true
`

注意:insecure设置为true,表示支持http访问

  1. 重新加载
1
2
wujianjun@wujianjun-work:~$ sudo systemctl daemon-reload
wujianjun@wujianjun-work:~$ sudo systemctl restart podman

测试生效

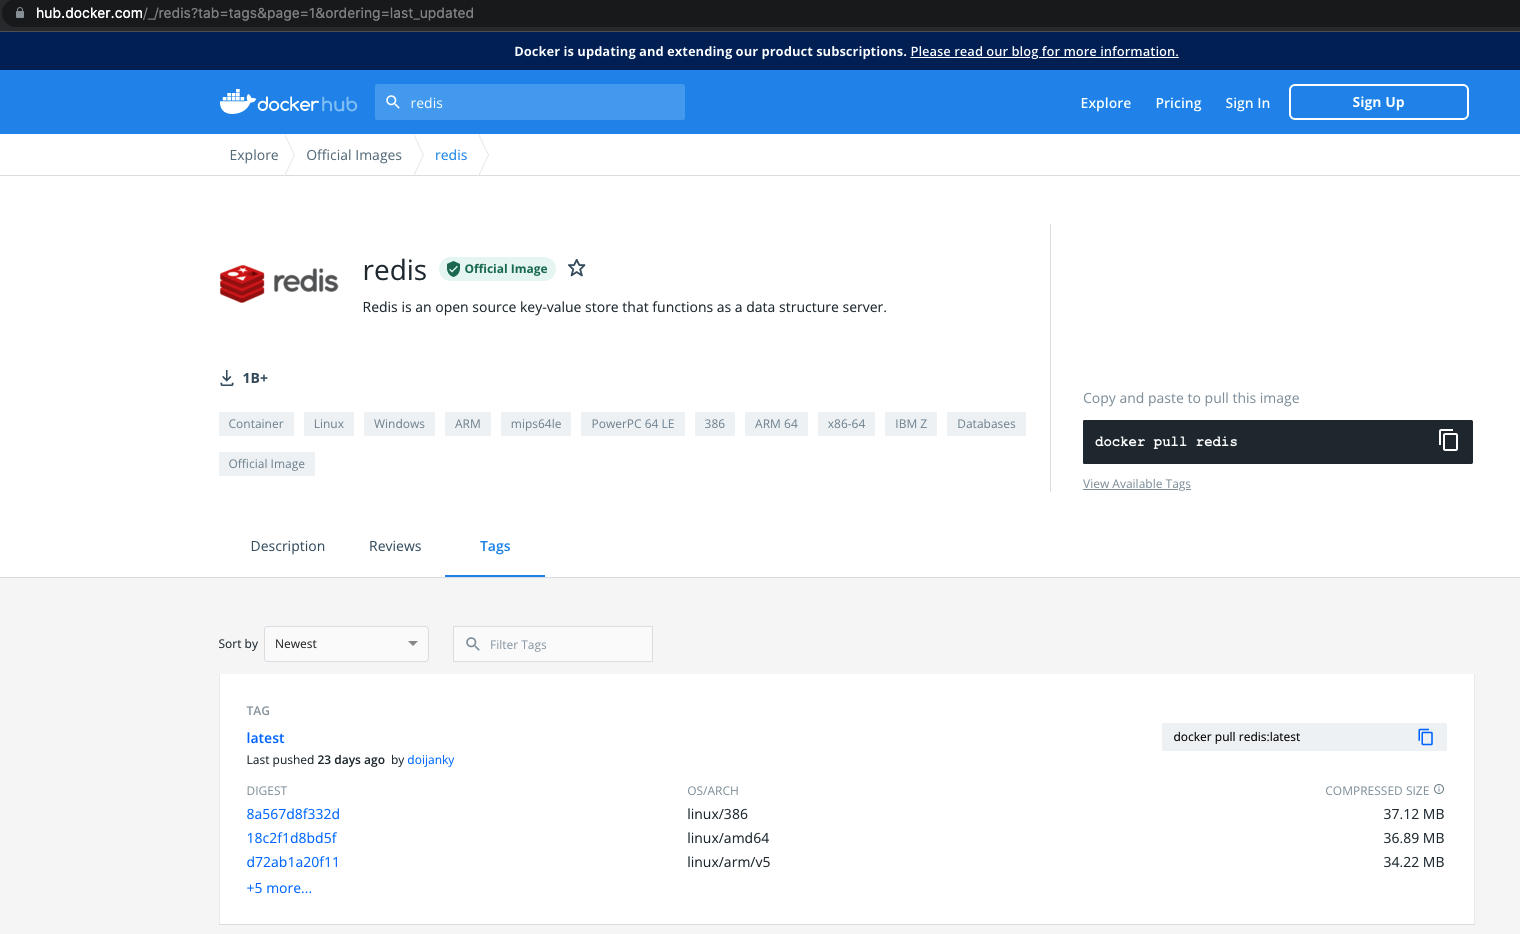
接下来以redis镜像来演示效果
docker-images-redis

  1. 拉取镜像
1
2
3
4
5
6
7
8
9
10
11
12
13
14
wujianjun@wujianjun-work:~$ podman pull redis:latest
Resolved "redis" as an alias (/home/wujianjun/.cache/containers/short-name-aliases.conf)
Trying to pull mirror.docker.com/library/redis:latest...
Getting image source signatures
Copying blob a330b6cecb98 skipped: already exists
Copying blob 4f9efe5b47a5 done
Copying blob 6af3a5ca4596 done
Copying blob 14bfbab96d75 done
Copying blob 8b3e2d14a955 done
Copying blob 5da5e1b21a2f done
Copying config 02c7f20544 done
Writing manifest to image destination
Storing signatures
02c7f2054405dadaf295fac7281034e998646996e9768e65a78f90af62218be3

此时再去私服上可以看到镜像已被镜像到私服上了

  1. 推送到私服
1
2
3
4
5
6
7
8
9
10
11
12
wujianjun@wujianjun-work:~$ podman tag redis mirror.docker.com/library/myredis:1.0.0
wujianjun@wujianjun-work:~$ podman push mirror.docker.com/library/myredis:1.0.0
Getting image source signatures
Copying blob be5818ef2907 done
Copying blob c54e0c16ea22 done
Copying blob bdad86443e47 done
Copying blob 6a7992ac4800 done
Copying blob be43d2475cf8 done
Copying blob d000633a5681 done
Copying config 02c7f20544 done
Writing manifest to image destination
Storing signatures
  1. 从私服拉取
1
2
3
4
5
6
7
8
9
10
11
12
13
14
15
16
17
wujianjun@wujianjun-work:~$ podman pull myredis:1.0.0
✔ mirror.docker.com/library/myredis:1.0.0
Trying to pull mirror.docker.com/library/myredis:1.0.0...
Getting image source signatures
Copying blob dec078b46822 skipped: already exists
Copying blob c10395c8d924 done
Copying blob 3c4c5d2db949 done
Copying blob 6f8bb7da49ba done
Copying blob 64906f58d083 done
Copying blob 991f02c53ad6 done
Copying config 02c7f20544 done
Writing manifest to image destination
Storing signatures
02c7f2054405dadaf295fac7281034e998646996e9768e65a78f90af62218be3
wujianjun@wujianjun-work:~$ podman images
REPOSITORY TAG IMAGE ID CREATED SIZE
mirror.docker.com/library/myredis 1.0.0 02c7f2054405 3 weeks ago 109 MB

常见问题

  1. 未登录私服

    1
    2
    3
    4
    5
    6
    7
    8
    9
    10
    11
    12
    13
    14
    15
    16
    17
    18
    19
    20
    21
    22
    23
    24
    25
    wujianjun@wujianjun-work:~$ podman pull redis:latest
    Resolved "redis" as an alias (/home/wujianjun/.cache/containers/short-name-aliases.conf)
    Trying to pull mirror.docker.com/library/redis:latest...
    Error: initializing source docker://redis:latest: Requesting bear token: invalid status code from registry 403 (Forbidden)
    wujianjun@wujianjun-work:~$ podman login -u developer mirror.docker.com
    Password:
    Login Succeeded!
    wujianjun@wujianjun-work:~$ podman pull redis:latest
    Resolved "redis" as an alias (/home/wujianjun/.cache/containers/short-name-aliases.conf)
    Trying to pull mirror.docker.com/library/redis:latest...
    Getting image source signatures
    Copying blob a330b6cecb98 skipped: already exists
    Copying blob 4f9efe5b47a5 done
    Copying blob 6af3a5ca4596 done
    Copying blob 14bfbab96d75 done
    Copying blob 8b3e2d14a955 done
    Copying blob 5da5e1b21a2f done
    Copying config 02c7f20544 done
    Writing manifest to image destination
    Storing signatures
    02c7f2054405dadaf295fac7281034e998646996e9768e65a78f90af62218be3
    wujianjun@wujianjun-work:~$
    wujianjun@wujianjun-work:~$ podman images
    REPOSITORY TAG IMAGE ID CREATED SIZE
    mirror.docker.com/library/redis latest 02c7f2054405 3 weeks ago 109 MB

    根因分析:由于未登录私服故返回403的错误,已登录的信息会保存在/run/user/1000/containers/auth.json文件中

  2. tag没有对应

    1
    2
    3
    4
    wujianjun@wujianjun-work:~$ podman pull myredis:v1.0.0
    ✔ mirror.docker.com/library/myredis:v1.0.0
    Trying to pull mirror.docker.com/library/myredis:v1.0.0...
    Error: initializing source docker://myredis:v1.0.0: reading manifest v1.0.0 in mirror.docker.com/library/myredis: manifest unknown: manifest unknown

    根因分析:由于tag为v1.0.0的myredis镜像没有找到

  3. 未开启http访问

    1
    2
    3
    4
    5
    wujianjun@wujianjun-work:~$ podman pull myredis:1.0.0
    ✔ mirror.docker.com/library/myredis:v1.0.0
    Trying to pull mirror.docker.com/library/myredis:1.0.0...
    Get https://mirror.docker.com/v2/: http: server gave HTTP response to HTTPS client
    Error: error pulling image "mirror.docker.com/library/myredis": unable to pull mirror.docker.com/library/myredis: unable to pull image: Error initializing source docker://mirror.docker.com/library/myredis:1.0.0: error pinging docker registry mirror.docker.com: Get https://mirror.docker.com/v2/: http: server gave HTTP response to HTTPS client

    根因分析:由于在注册私服地址时没有开启insecure = true


观点仅代表自己,期待你的留言。

Java8 Stream之实例玩转集合的筛选、归约、分组、聚合

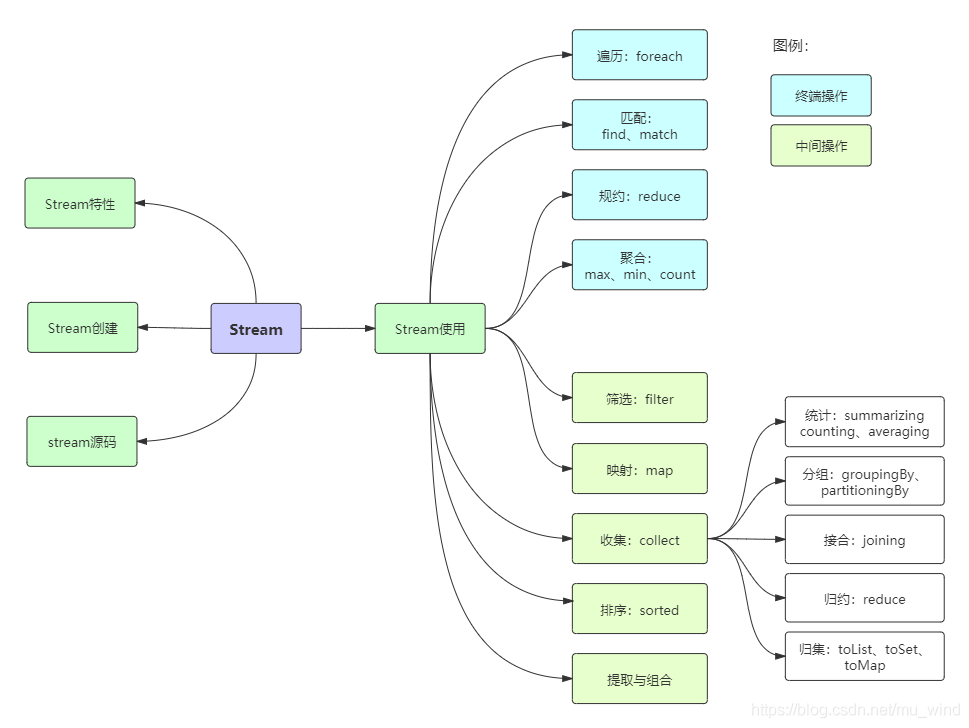
功能全景

Java8Stream全景

Stream概述

Java 8 是一个非常成功的版本,这个版本新增的Stream,配合同版本出现的 Lambda ,给我们操作集合(Collection)提供了极大的便利。

那么什么是Stream

Stream将要处理的元素集合看作一种流,在流的过程中,借助Stream API对流中的元素进行操作,比如:筛选、排序、聚合等。

Stream可以由数组或集合创建,对流的操作分为两种:

  1. 中间操作,每次返回一个新的流,可以有多个。
  2. 终端操作,每个流只能进行一次终端操作,终端操作结束后流无法再次使用。终端操作会产生一个新的集合或值。

另外,Stream有几个特性:

  1. stream不存储数据,而是按照特定的规则对数据进行计算,一般会输出结果。
  2. stream不会改变数据源,通常情况下会产生一个新的集合或一个值。
  3. stream具有延迟执行特性,只有调用终端操作时,中间操作才会执行。

Stream的创建

Stream可以通过集合数组创建。

  1. 通过 java.util.Collection.stream()方法用集合创建流
1
2
3
4
5
List<String> list = Arrays.asList("a", "b", "c");
// 创建一个顺序流
Stream<String> stream = list.stream();
// 创建一个并行流
Stream<String> parallelStream = list.parallelStream();
  1. 使用java.util.Arrays.stream(T[] array)方法用数组创建流
1
2
int[] array={1,3,5,6,8};
IntStream stream = Arrays.stream(array);
  1. 使用Stream的静态方法:of()、iterate()、generate()
1
2
3
4
5
6
7
Stream<Integer> stream = Stream.of(1, 2, 3, 4, 5, 6);

Stream<Integer> stream2 = Stream.iterate(0, (x) -> x + 3).limit(4);
stream2.forEach(System.out::println);

Stream<Double> stream3 = Stream.generate(Math::random).limit(3);
stream3.forEach(System.out::println);

stream和parallelStream的简单区分

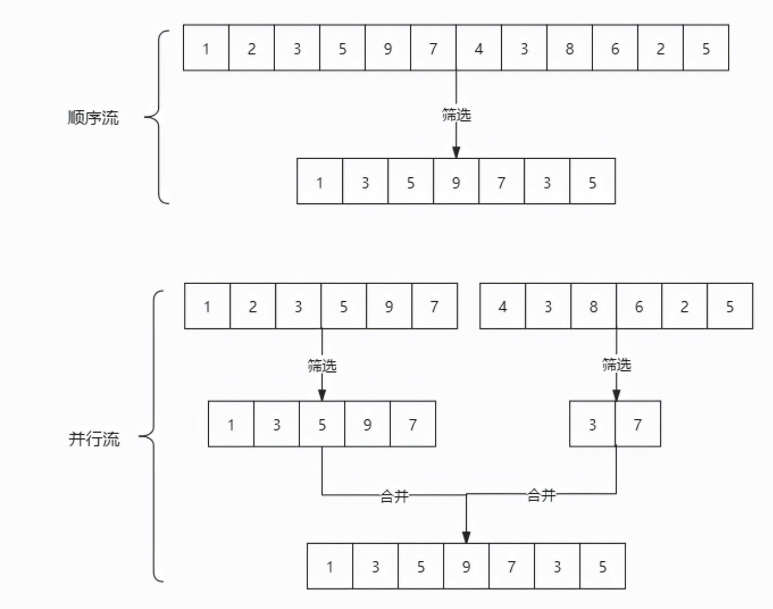
stream是顺序流,由主线程按顺序对流执行操作。

parallelStream是并行流,内部以多线程并行执行的方式对流进行操作,但前提是流中的数据处理没有顺序要求。例如筛选集合中的奇数,两者的处理不同之处:

stream和parallelStream

如果流中的数据量足够大,并行流可以加快处速度。

除了直接创建并行流,还可以通过parallel()把顺序流转换成并行流:

1
Optional<Integer> findFirst = list.stream().parallel().filter(x->x>6).findFirst();

Stream的使用

在使用stream之前,先理解一个概念:Optional。

Optional类是一个可以为null的容器对象。如果值存在则isPresent()方法会返回true,调用get()方法会返回该对象。 更详细说明请见:菜鸟教程Java 8 Optional类

案例使用的员工类

1
2
3
4
5
6
7
8
9
10
11
12
13
14
15
16
17
18
19
20
21
22
23
24
25
26
List<Person> personList = new ArrayList<Person>();
personList.add(new Person("Tom", 8900, "male", "New York"));
personList.add(new Person("Jack", 7000, "male", "Washington"));
personList.add(new Person("Lily", 7800, "female", "Washington"));
personList.add(new Person("Anni", 8200, "female", "New York"));
personList.add(new Person("Owen", 9500, "male", "New York"));
personList.add(new Person("Alisa", 7900, "female", "New York"));

class Person {
private String name; // 姓名
private int salary; // 薪资
private int age; // 年龄
private String sex; //性别
private String area; // 地区

// 构造方法
public Person(String name, int salary, int age,String sex,String area) {
this.name = name;
this.salary = salary;
this.age = age;
this.sex = sex;
this.area = area;
}
// 省略了get和set,请自行添加

}

遍历/匹配(foreach/find/match)

Stream也是支持类似集合的遍历和匹配元素的,只是Stream中的元素是以Optional类型存在的。Stream的遍历、匹配非常简单。

1
2
3
4
5
6
7
8
9
10
11
12
13
14
15
16
17
18
// import已省略,请自行添加,后面代码亦是
public class StreamTest {
public static void main(String[] args) {
List<Integer> list = Arrays.asList(7, 6, 9, 3, 8, 2, 1);

// 遍历输出符合条件的元素
list.stream().filter(x -> x > 6).forEach(System.out::println);
// 匹配第一个
Optional<Integer> findFirst = list.stream().filter(x -> x > 6).findFirst();
// 匹配任意(适用于并行流)
Optional<Integer> findAny = list.parallelStream().filter(x -> x > 6).findAny();
// 是否包含符合特定条件的元素
boolean anyMatch = list.stream().anyMatch(x -> x < 6);
System.out.println("匹配第一个值:" + findFirst.get());
System.out.println("匹配任意一个值:" + findAny.get());
System.out.println("是否存在大于6的值:" + anyMatch);
}
}

筛选(filter)

筛选,是按照一定的规则校验流中的元素,将符合条件的元素提取到新的流中的操作。

  • 案例一:筛选出Integer集合中大于7的元素,并打印出来

    1
    2
    3
    4
    5
    6
    7
    public class StreamTest {
    public static void main(String[] args) {
    List<Integer> list = Arrays.asList(6, 7, 3, 8, 1, 2, 9);
    Stream<Integer> stream = list.stream();
    stream.filter(x -> x > 7).forEach(System.out::println);
    }
    }

    运行结果:

    8 9

  • 案例二: 筛选员工中工资高于8000的人,并形成新的集合。 形成新集合依赖collect(收集),后文有详细介绍。

    1
    2
    3
    4
    5
    6
    7
    8
    9
    10
    11
    12
    13
    14
    15
    public class StreamTest {
    public static void main(String[] args) {
    List<Person> personList = new ArrayList<Person>();
    personList.add(new Person("Tom", 8900, 23, "male", "New York"));
    personList.add(new Person("Jack", 7000, 25, "male", "Washington"));
    personList.add(new Person("Lily", 7800, 21, "female", "Washington"));
    personList.add(new Person("Anni", 8200, 24, "female", "New York"));
    personList.add(new Person("Owen", 9500, 25, "male", "New York"));
    personList.add(new Person("Alisa", 7900, 26, "female", "New York"));

    List<String> fiterList = personList.stream().filter(x -> x.getSalary() > 8000).map(Person::getName)
    .collect(Collectors.toList());
    System.out.print("高于8000的员工姓名:" + fiterList);
    }
    }

    运行结果:

    高于8000的员工姓名:[Tom, Anni, Owen]

聚合(max/min/count)

max、min、count这些字眼你一定不陌生,没错,在mysql中我们常用它们进行数据统计。Java stream中也引入了这些概念和用法,极大地方便了我们对集合、数组的数据统计工作。

  • 案例一:获取String集合中最长的元素。

    1
    2
    3
    4
    5
    6
    7
    8
    public class StreamTest {
    public static void main(String[] args) {
    List<String> list = Arrays.asList("adnm", "admmt", "pot", "xbangd", "weoujgsd");

    Optional<String> max = list.stream().max(Comparator.comparing(String::length));
    System.out.println("最长的字符串:" + max.get());
    }
    }

    运行结果:

    最长的字符串:weoujgsd

  • 案例二:获取Integer集合中的最大值。

    1
    2
    3
    4
    5
    6
    7
    8
    9
    10
    11
    12
    13
    14
    15
    16
    17
    public class StreamTest {
    public static void main(String[] args) {
    List<Integer> list = Arrays.asList(7, 6, 9, 4, 11, 6);

    // 自然排序
    Optional<Integer> max = list.stream().max(Integer::compareTo);
    // 自定义排序
    Optional<Integer> max2 = list.stream().max(new Comparator<Integer>() {
    @Override
    public int compare(Integer o1, Integer o2) {
    return o1.compareTo(o2);
    }
    });
    System.out.println("自然排序的最大值:" + max.get());
    System.out.println("自定义排序的最大值:" + max2.get());
    }
    }

    运行结果:

    自然排序的最大值:11

    自定义排序的最大值:11

  • 案例三:获取员工工资最高的人。

    1
    2
    3
    4
    5
    6
    7
    8
    9
    10
    11
    12
    13
    14
    public class StreamTest {
    public static void main(String[] args) {
    List<Person> personList = new ArrayList<Person>();
    personList.add(new Person("Tom", 8900, 23, "male", "New York"));
    personList.add(new Person("Jack", 7000, 25, "male", "Washington"));
    personList.add(new Person("Lily", 7800, 21, "female", "Washington"));
    personList.add(new Person("Anni", 8200, 24, "female", "New York"));
    personList.add(new Person("Owen", 9500, 25, "male", "New York"));
    personList.add(new Person("Alisa", 7900, 26, "female", "New York"));

    Optional<Person> max = personList.stream().max(Comparator.comparingInt(Person::getSalary));
    System.out.println("员工工资最大值:" + max.get().getSalary());
    }
    }

    运行结果:

    员工工资最大值:9500

  • 案例四:计算Integer集合中大于6的元素的个数。

    1
    2
    3
    4
    5
    6
    7
    8
    public class StreamTest {
    public static void main(String[] args) {
    List<Integer> list = Arrays.asList(7, 6, 4, 8, 2, 11, 9);

    long count = list.stream().filter(x -> x > 6).count();
    System.out.println("list中大于6的元素个数:" + count);
    }
    }

    运行结果:

    list中大于6的元素个数:4

映射(map/flatMap)

映射,可以将一个流的元素按照一定的映射规则映射到另一个流中。分为map和flatMap:

  1. map:接收一个函数作为参数,该函数会被应用到每个元素上,并将其映射成一个新的元素。
  2. flatMap:接收一个函数作为参数,将流中的每个值都换成另一个流,然后把所有流连接成一个流。
  • 案例一:英文字符串数组的元素全部改为大写。整数数组每个元素+3。

    1
    2
    3
    4
    5
    6
    7
    8
    9
    10
    11
    12
    public class StreamTest {
    public static void main(String[] args) {
    String[] strArr = { "abcd", "bcdd", "defde", "fTr" };
    List<String> strList = Arrays.stream(strArr).map(String::toUpperCase).collect(Collectors.toList());

    List<Integer> intList = Arrays.asList(1, 3, 5, 7, 9, 11);
    List<Integer> intListNew = intList.stream().map(x -> x + 3).collect(Collectors.toList());

    System.out.println("每个元素大写:" + strList);
    System.out.println("每个元素+3:" + intListNew);
    }
    }

    运行结果:

    每个元素大写:[ABCD, BCDD, DEFDE, FTR]

    每个元素+3:[4, 6, 8, 10, 12, 14]

  • 案例二:将员工的薪资全部增加1000

    1
    2
    3
    4
    5
    6
    7
    8
    9
    10
    11
    12
    13
    14
    15
    16
    17
    18
    19
    20
    21
    22
    23
    24
    25
    26
    27
    28
    public class StreamTest {
    public static void main(String[] args) {
    List<Person> personList = new ArrayList<Person>();
    personList.add(new Person("Tom", 8900, 23, "male", "New York"));
    personList.add(new Person("Jack", 7000, 25, "male", "Washington"));
    personList.add(new Person("Lily", 7800, 21, "female", "Washington"));
    personList.add(new Person("Anni", 8200, 24, "female", "New York"));
    personList.add(new Person("Owen", 9500, 25, "male", "New York"));
    personList.add(new Person("Alisa", 7900, 26, "female", "New York"));

    // 不改变原来员工集合的方式
    List<Person> personListNew = personList.stream().map(person -> {
    Person personNew = new Person(person.getName(), 0, 0, null, null);
    personNew.setSalary(person.getSalary() + 10000);
    return personNew;
    }).collect(Collectors.toList());
    System.out.println("一次改动前:" + personList.get(0).getName() + "-->" + personList.get(0).getSalary());
    System.out.println("一次改动后:" + personListNew.get(0).getName() + "-->" + personListNew.get(0).getSalary());

    // 改变原来员工集合的方式
    List<Person> personListNew2 = personList.stream().map(person -> {
    person.setSalary(person.getSalary() + 10000);
    return person;
    }).collect(Collectors.toList());
    System.out.println("二次改动前:" + personList.get(0).getName() + "-->" + personListNew.get(0).getSalary());
    System.out.println("二次改动后:" + personListNew2.get(0).getName() + "-->" + personListNew.get(0).getSalary());
    }
    }

    运行结果:

    一次改动前:Tom–>8900

    一次改动后:Tom–>18900

    二次改动前:Tom–>18900

    二次改动后:Tom–>18900

  • 案例三:将两个字符数组合并成一个新的字符数组。

    1
    2
    3
    4
    5
    6
    7
    8
    9
    10
    11
    12
    13
    14
    public class StreamTest {
    public static void main(String[] args) {
    List<String> list = Arrays.asList("m,k,l,a", "1,3,5,7");
    List<String> listNew = list.stream().flatMap(s -> {
    // 将每个元素转换成一个stream
    String[] split = s.split(",");
    Stream<String> s2 = Arrays.stream(split);
    return s2;
    }).collect(Collectors.toList());

    System.out.println("处理前的集合:" + list);
    System.out.println("处理后的集合:" + listNew);
    }
    }

    运行结果:

    处理前的集合:[m-k-l-a, 1-3-5]

    处理后的集合:[m, k, l, a, 1, 3, 5]

归约(reduce)

归约,也称缩减,顾名思义,是把一个流缩减成一个值,能实现对集合求和、求乘积和求最值操作。

  • 案例一:求Integer集合的元素之和、乘积和最大值。

    1
    2
    3
    4
    5
    6
    7
    8
    9
    10
    11
    12
    13
    14
    15
    16
    17
    18
    19
    20
    21
    22
    23
    public class StreamTest {
    public static void main(String[] args) {
    List<Integer> list = Arrays.asList(1, 3, 2, 8, 11, 4);
    // 求和方式1
    Optional<Integer> sum = list.stream().reduce((x, y) -> x + y);
    // 求和方式2
    Optional<Integer> sum2 = list.stream().reduce(Integer::sum);
    // 求和方式3
    Integer sum3 = list.stream().reduce(0, Integer::sum);

    // 求乘积
    Optional<Integer> product = list.stream().reduce((x, y) -> x * y);

    // 求最大值方式1
    Optional<Integer> max = list.stream().reduce((x, y) -> x > y ? x : y);
    // 求最大值写法2
    Integer max2 = list.stream().reduce(1, Integer::max);

    System.out.println("list求和:" + sum.get() + "," + sum2.get() + "," + sum3);
    System.out.println("list求积:" + product.get());
    System.out.println("list求和:" + max.get() + "," + max2);
    }
    }

    运行结果:

    list求和:29,29,29

    list求积:2112

    list求和:11,11

  • 案例二:求所有员工的工资之和和最高工资。

    1
    2
    3
    4
    5
    6
    7
    8
    9
    10
    11
    12
    13
    14
    15
    16
    17
    18
    19
    20
    21
    22
    23
    24
    25
    26
    27
    28
    29
    public class StreamTest {
    public static void main(String[] args) {
    List<Person> personList = new ArrayList<Person>();
    personList.add(new Person("Tom", 8900, 23, "male", "New York"));
    personList.add(new Person("Jack", 7000, 25, "male", "Washington"));
    personList.add(new Person("Lily", 7800, 21, "female", "Washington"));
    personList.add(new Person("Anni", 8200, 24, "female", "New York"));
    personList.add(new Person("Owen", 9500, 25, "male", "New York"));
    personList.add(new Person("Alisa", 7900, 26, "female", "New York"));

    // 求工资之和方式1:
    Optional<Integer> sumSalary = personList.stream().map(Person::getSalary).reduce(Integer::sum);
    // 求工资之和方式2:
    Integer sumSalary2 = personList.stream().reduce(0, (sum, p) -> sum += p.getSalary(),
    (sum1, sum2) -> sum1 + sum2);
    // 求工资之和方式3:
    Integer sumSalary3 = personList.stream().reduce(0, (sum, p) -> sum += p.getSalary(), Integer::sum);

    // 求最高工资方式1:
    Integer maxSalary = personList.stream().reduce(0, (max, p) -> max > p.getSalary() ? max : p.getSalary(),
    Integer::max);
    // 求最高工资方式2:
    Integer maxSalary2 = personList.stream().reduce(0, (max, p) -> max > p.getSalary() ? max : p.getSalary(),
    (max1, max2) -> max1 > max2 ? max1 : max2);

    System.out.println("工资之和:" + sumSalary.get() + "," + sumSalary2 + "," + sumSalary3);
    System.out.println("最高工资:" + maxSalary + "," + maxSalary2);
    }
    }

    运行结果:

    工资之和:49300,49300,49300

    最高工资:9500,9500

收集(collect)

collect,收集,可以说是内容最繁多、功能最丰富的部分了。从字面上去理解,就是把一个流收集起来,最终可以是收集成一个值也可以收集成一个新的集合。

collect主要依赖java.util.stream.Collectors类内置的静态方法。

归集(toList/toSet/toMap)

因为流不存储数据,那么在流中的数据完成处理后,需要将流中的数据重新归集到新的集合里。toList、toSet和toMap比较常用,另外还有toCollection、toConcurrentMap等复杂一些的用法。

下面用一个案例演示toList、toSet和toMap:

1
2
3
4
5
6
7
8
9
10
11
12
13
14
15
16
17
18
19
public class StreamTest {
public static void main(String[] args) {
List<Integer> list = Arrays.asList(1, 6, 3, 4, 6, 7, 9, 6, 20);
List<Integer> listNew = list.stream().filter(x -> x % 2 == 0).collect(Collectors.toList());
Set<Integer> set = list.stream().filter(x -> x % 2 == 0).collect(Collectors.toSet());

List<Person> personList = new ArrayList<Person>();
personList.add(new Person("Tom", 8900, 23, "male", "New York"));
personList.add(new Person("Jack", 7000, 25, "male", "Washington"));
personList.add(new Person("Lily", 7800, 21, "female", "Washington"));
personList.add(new Person("Anni", 8200, 24, "female", "New York"));

Map<?, Person> map = personList.stream().filter(p -> p.getSalary() > 8000)
.collect(Collectors.toMap(Person::getName, p -> p));
System.out.println("toList:" + listNew);
System.out.println("toSet:" + set);
System.out.println("toMap:" + map);
}
}

运行结果:

toList:[6, 4, 6, 6, 20]

toSet:[4, 20, 6]

toMap:{Tom=mutest.Person@5fd0d5ae, Anni=mutest.Person@2d98a335}

统计(count/averaging)

Collectors提供了一系列用于数据统计的静态方法:

  1. 计数:count
  2. 平均值:averagingInt、averagingLong、averagingDouble
  3. 最值:maxBy、minBy
  4. 求和:summingInt、summingLong、summingDouble
  5. 统计以上所有:summarizingInt、summarizingLong、summarizingDouble

案例:统计员工人数、平均工资、工资总额、最高工资。

1
2
3
4
5
6
7
8
9
10
11
12
13
14
15
16
17
18
19
20
21
22
23
24
public class StreamTest {
public static void main(String[] args) {
List<Person> personList = new ArrayList<Person>();
personList.add(new Person("Tom", 8900, 23, "male", "New York"));
personList.add(new Person("Jack", 7000, 25, "male", "Washington"));
personList.add(new Person("Lily", 7800, 21, "female", "Washington"));

// 求总数
Long count = personList.stream().collect(Collectors.counting());
// 求平均工资
Double average = personList.stream().collect(Collectors.averagingDouble(Person::getSalary));
// 求最高工资
Optional<Integer> max = personList.stream().map(Person::getSalary).collect(Collectors.maxBy(Integer::compare));
// 求工资之和
Integer sum = personList.stream().collect(Collectors.summingInt(Person::getSalary));
// 一次性统计所有信息
DoubleSummaryStatistics collect = personList.stream().collect(Collectors.summarizingDouble(Person::getSalary));

System.out.println("员工总数:" + count);
System.out.println("员工平均工资:" + average);
System.out.println("员工工资总和:" + sum);
System.out.println("员工工资所有统计:" + collect);
}
}

运行结果:

员工总数:3

员工平均工资:7900.0

员工工资总和:23700

员工工资所有统计:DoubleSummaryStatistics{count=3, sum=23700.000000,min=7000.000000, average=7900.000000, max=8900.000000}

分组(partitioningBy/groupingBy)

  1. 分区:将stream按条件分为两个Map,比如员工按薪资是否高于8000分为两部分。
  2. 分组:将集合分为多个Map,比如员工按性别分组。有单级分组和多级分组。

案例:将员工按薪资是否高于8000分为两部分;将员工按性别和地区分组

1
2
3
4
5
6
7
8
9
10
11
12
13
14
15
16
17
18
19
20
21
public class StreamTest {
public static void main(String[] args) {
List<Person> personList = new ArrayList<Person>();
personList.add(new Person("Tom", 8900, "male", "New York"));
personList.add(new Person("Jack", 7000, "male", "Washington"));
personList.add(new Person("Lily", 7800, "female", "Washington"));
personList.add(new Person("Anni", 8200, "female", "New York"));
personList.add(new Person("Owen", 9500, "male", "New York"));
personList.add(new Person("Alisa", 7900, "female", "New York"));

// 将员工按薪资是否高于8000分组
Map<Boolean, List<Person>> part = personList.stream().collect(Collectors.partitioningBy(x -> x.getSalary() > 8000));
// 将员工按性别分组
Map<String, List<Person>> group = personList.stream().collect(Collectors.groupingBy(Person::getSex));
// 将员工先按性别分组,再按地区分组
Map<String, Map<String, List<Person>>> group2 = personList.stream().collect(Collectors.groupingBy(Person::getSex, Collectors.groupingBy(Person::getArea)));
System.out.println("员工按薪资是否大于8000分组情况:" + part);
System.out.println("员工按性别分组情况:" + group);
System.out.println("员工按性别、地区:" + group2);
}
}

运行结果:

员工按薪资是否大于8000分组情况:{false=[mutest.Person@2d98a335, mutest.Person@16b98e56, mutest.Person@7ef20235], true=[mutest.Person@27d6c5e0, mutest.Person@4f3f5b24, mutest.Person@15aeb7ab]}

员工按性别分组情况:{female=[mutest.Person@16b98e56, mutest.Person@4f3f5b24, mutest.Person@7ef20235], male=[mutest.Person@27d6c5e0, mutest.Person@2d98a335, mutest.Person@15aeb7ab]}

员工按性别、地区:{female={New York=[mutest.Person@4f3f5b24, mutest.Person@7ef20235], Washington=[mutest.Person@16b98e56]}, male={New York=[mutest.Person@27d6c5e0, mutest.Person@15aeb7ab], Washington=[mutest.Person@2d98a335]}}

接合(joining)

joining可以将stream中的元素用特定的连接符(没有的话,则直接连接)连接成一个字符串。

1
2
3
4
5
6
7
8
9
10
11
12
13
14
public class StreamTest {
public static void main(String[] args) {
List<Person> personList = new ArrayList<Person>();
personList.add(new Person("Tom", 8900, 23, "male", "New York"));
personList.add(new Person("Jack", 7000, 25, "male", "Washington"));
personList.add(new Person("Lily", 7800, 21, "female", "Washington"));

String names = personList.stream().map(p -> p.getName()).collect(Collectors.joining(","));
System.out.println("所有员工的姓名:" + names);
List<String> list = Arrays.asList("A", "B", "C");
String string = list.stream().collect(Collectors.joining("-"));
System.out.println("拼接后的字符串:" + string);
}
}

运行结果:

所有员工的姓名:Tom,Jack,Lily

拼接后的字符串:A-B-C

归约(reducing)

Collectors类提供的reducing方法,相比于stream本身的reduce方法,增加了对自定义归约的支持。

1
2
3
4
5
6
7
8
9
10
11
12
13
14
15
16
public class StreamTest {
public static void main(String[] args) {
List<Person> personList = new ArrayList<Person>();
personList.add(new Person("Tom", 8900, 23, "male", "New York"));
personList.add(new Person("Jack", 7000, 25, "male", "Washington"));
personList.add(new Person("Lily", 7800, 21, "female", "Washington"));

// 每个员工减去起征点后的薪资之和(这个例子并不严谨,但一时没想到好的例子)
Integer sum = personList.stream().collect(Collectors.reducing(0, Person::getSalary, (i, j) -> (i + j - 5000)));
System.out.println("员工扣税薪资总和:" + sum);

// stream的reduce
Optional<Integer> sum2 = personList.stream().map(Person::getSalary).reduce(Integer::sum);
System.out.println("员工薪资总和:" + sum2.get());
}
}

运行结果:

员工扣税薪资总和:8700

员工薪资总和:23700

排序(sorted)

sorted,中间操作。有两种排序:

  1. sorted():自然排序,流中元素需实现Comparable接口
  2. sorted(Comparator com):Comparator排序器自定义排序

案例:将员工按工资由高到低(工资一样则按年龄由大到小)排序

1
2
3
4
5
6
7
8
9
10
11
12
13
14
15
16
17
18
19
20
21
22
23
24
25
26
27
28
29
30
31
32
33
34
35
public class StreamTest {
public static void main(String[] args) {
List<Person> personList = new ArrayList<Person>();

personList.add(new Person("Sherry", 9000, 24, "female", "New York"));
personList.add(new Person("Tom", 8900, 22, "male", "Washington"));
personList.add(new Person("Jack", 9000, 25, "male", "Washington"));
personList.add(new Person("Lily", 8800, 26, "male", "New York"));
personList.add(new Person("Alisa", 9000, 26, "female", "New York"));

// 按工资升序排序(自然排序)
List<String> newList = personList.stream().sorted(Comparator.comparing(Person::getSalary)).map(Person::getName)
.collect(Collectors.toList());
// 按工资倒序排序
List<String> newList2 = personList.stream().sorted(Comparator.comparing(Person::getSalary).reversed())
.map(Person::getName).collect(Collectors.toList());
// 先按工资再按年龄升序排序
List<String> newList3 = personList.stream()
.sorted(Comparator.comparing(Person::getSalary).thenComparing(Person::getAge)).map(Person::getName)
.collect(Collectors.toList());
// 先按工资再按年龄自定义排序(降序)
List<String> newList4 = personList.stream().sorted((p1, p2) -> {
if (p1.getSalary() == p2.getSalary()) {
return p2.getAge() - p1.getAge();
} else {
return p2.getSalary() - p1.getSalary();
}
}).map(Person::getName).collect(Collectors.toList());

System.out.println("按工资升序排序:" + newList);
System.out.println("按工资降序排序:" + newList2);
System.out.println("先按工资再按年龄升序排序:" + newList3);
System.out.println("先按工资再按年龄自定义降序排序:" + newList4);
}
}

运行结果:

按工资升序排序:[Lily, Tom, Sherry, Jack, Alisa]

按工资降序排序:[Sherry, Jack, Alisa, Tom, Lily]

先按工资再按年龄升序排序:[Lily, Tom, Sherry, Jack, Alisa]

先按工资再按年龄自定义降序排序:[Alisa, Jack, Sherry, Tom, Lily]

提取/组合

流也可以进行合并、去重、限制、跳过等操作。

1
2
3
4
5
6
7
8
9
10
11
12
13
14
15
16
17
18
19
public class StreamTest {
public static void main(String[] args) {
String[] arr1 = { "a", "b", "c", "d" };
String[] arr2 = { "d", "e", "f", "g" };

Stream<String> stream1 = Stream.of(arr1);
Stream<String> stream2 = Stream.of(arr2);
// concat:合并两个流 distinct:去重
List<String> newList = Stream.concat(stream1, stream2).distinct().collect(Collectors.toList());
// limit:限制从流中获得前n个数据
List<Integer> collect = Stream.iterate(1, x -> x + 2).limit(10).collect(Collectors.toList());
// skip:跳过前n个数据
List<Integer> collect2 = Stream.iterate(1, x -> x + 2).skip(1).limit(5).collect(Collectors.toList());

System.out.println("流合并:" + newList);
System.out.println("limit:" + collect);
System.out.println("skip:" + collect2);
}
}

运行结果:

流合并:[a, b, c, d, e, f, g]

limit:[1, 3, 5, 7, 9, 11, 13, 15, 17, 19]

skip:[3, 5, 7, 9, 11]


转载自 https://blog.csdn.net/mu_wind/article/details/109516995

观点仅代表自己,期待你的留言。

podman系列之ubuntu下podman环境搭建

Linux环境信息

1
2
3
4
5
6
7
8
9
10
11
12
13
wujianjun@wujianjun-work:~$ cat /etc/os-release
PRETTY_NAME="Ubuntu 22.04.1 LTS"
NAME="Ubuntu"
VERSION_ID="22.04"
VERSION="22.04.1 LTS (Jammy Jellyfish)"
VERSION_CODENAME=jammy
ID=ubuntu
ID_LIKE=debian
HOME_URL="https://www.ubuntu.com/"
SUPPORT_URL="https://help.ubuntu.com/"
BUG_REPORT_URL="https://bugs.launchpad.net/ubuntu/"
PRIVACY_POLICY_URL="https://www.ubuntu.com/legal/terms-and-policies/privacy-policy"
UBUNTU_CODENAME=jammy

安装podman

1
2
3
4
5
6
7
8
9
10
wujianjun@wujianjun-work:~$ sudo mkdir -p /etc/apt/keyrings
wujianjun@wujianjun-work:~$ curl -fsSL https://download.opensuse.org/repositories/devel:kubic:libcontainers:unstable/xUbuntu_$(lsb_release -rs)/Release.key \
| gpg --dearmor \
| sudo tee /etc/apt/keyrings/devel_kubic_libcontainers_unstable.gpg > /dev/null
wujianjun@wujianjun-work:~$ echo \
"deb [arch=$(dpkg --print-architecture) signed-by=/etc/apt/keyrings/devel_kubic_libcontainers_unstable.gpg] \
https://download.opensuse.org/repositories/devel:kubic:libcontainers:unstable/xUbuntu_$(lsb_release -rs)/ /" \
| sudo tee /etc/apt/sources.list.d/devel:kubic:libcontainers:unstable.list > /dev/null
wujianjun@wujianjun-work:~$ sudo apt update && sudo apt -y upgrade
wujianjun@wujianjun-work:~$ sudo apt -y install podman

速度有点慢。。。

设置国内镜像源

由于访问速度慢,可为默认的docker.io添加加速镜像(如果后续自己搭建私服,可将镜像地址设置为私服,则每次pull时会将镜像在私服上保存一份)。
详细配置如下:

1
2
3
4
5
6
7
8
wujianjun@wujianjun-work:~$ vi /etc/containers/registries.conf 后面增加
`
[[registry]]
prefix = "docker.io" #需要加速的镜像地址
location = "hub-mirror.c.163.com" #加速器地址,可以为私服地址
insecure = true #支持加速器地址使用http进行访问
`
wujianjun@wujianjun-work:~$ sudo systemctl restart podman

开机自启podman

1
wujianjun@wujianjun-work:~$ sudo systemctl enable podman

验证安装版本

1
2
3
4
5
6
7
wujianjun@wujianjun-work:~$ podman version
Version: 3.2.3
API Version: 3.2.3
Go Version: go1.15.2
Built: Thu Jan 1 00:00:00 1970
OS/Arch: linux/amd64

安装podman-compose

1
2
3
4
wujianjun@wujianjun-work:~$ sudo apt install python3-pip
wujianjun@wujianjun-work:~$ pip3 install podman-compose
wujianjun@wujianjun-work:~$ podman-compose --version


观点仅代表自己,期待你的留言。

内网linux远程访问

开通ssh远程端口

通过外网做端口映射出ssh端口(22)之后,通过外网IP进行访问

安装vpn

利用vpn软件远程登录进内网进行内网linux的访问

内网找一台电脑安装软件(如:向日葵、TeamViewer等)

安装cockpit

Cockpit是一个Web端的系统管理工具。Cockpit使用系统上已经存在的API。可以在Web界面管理服务、容器、存储等等,还可以配置网络、检查日志都非常方便。

由于22端口映射过于敏感,可以在内网linux上安装cockpit后,然后再做外网映射(默认9090)映射完成后,则可通过浏览器使用linux登录用户进行登录访问。

安装

CentOS

1
wujianjun@wujianjun-work:~$ sudo yum install cockpit

Ubuntu

1
wujianjun@wujianjun-work:~$ sudo apt install cockpit

端口更改

默认端口为9090,如果遇上端口冲突可按以下方式进行修改

1
2
3
wujianjun@wujianjun-work:~$ sudo vi /etc/systemd/system/sockets.target.wants/cockpit.socket #更改ListenStream后的端口号
wujianjun@wujianjun-work:~$ sudo systemctl restart cockpit.socket
wujianjun@wujianjun-work:~$ sudo systemctl daemon-reload

观点仅代表自己,期待你的留言。

FindbugsMaven插件集成生成html报告

maven配置

在pom.xml中加入

1
2
3
4
5
6
7
8
9
10
11
12
13
14
15
16
17
18
19
20
21
22
23
24
25
26
27
28
<reporting>
<plugins>
<plugin>
<groupId>org.codehaus.mojo</groupId>
<artifactId>findbugs-maven-plugin</artifactId>
<version>3.0.5</version>
<configuration>
<effort>Max</effort>
<threshold>High</threshold>
<xmlOutput>false</xmlOutput>
</configuration>
</plugin>
</plugins>
</reporting>
<build>
<plugin>
<groupId>org.apache.maven.plugins</groupId>
<artifactId>maven-site-plugin</artifactId>
<version>3.9.1</version>
<dependencies>
<dependency>
<groupId>org.apache.maven.doxia</groupId>
<artifactId>doxia-site-renderer</artifactId>
<version>1.10</version>
</dependency>
</dependencies>
</plugin>
</build>

运行

在pom.xml所在目录执行mvn compile site生成报告
在target/site目录中则能查看到扫描报告


观点仅代表自己,期待你的留言。

运营之活动策划

运营之活动策划

日常活动(提升UV、拉新)

  • 签到
  • 0点、10点、15点限时兑换、限时秒杀
  • 抽奖
  • 会员日专属福利
  • 邀请码
  • 虚拟宝贝养成计划
    业务事件活动(提升复购率)
  • 消费即返券、消费即返积分
  • 按消费习惯进行个性推荐
    热点事件活动(提升UV)
  • 周年庆
  • 有奖竞猜
  • 事件评论、事件转发
  • 节日

观点仅代表自己,期待你的留言。